Showing posts with label Silhouette. Show all posts

Thursday, March 7, 2013

St. Patrick's Day Garland

I wanted to make a cute St. Patrick's Day garland for my front entry way. But with Easter falling at the end of March this year, I decided to combine the two holidays into one.   I knew that I wouldn't have time to make one for each with a new baby due any day now!


 I found a cute pattern on the Silhouette Online store and used my machine to cut out the circles.  With a little bit of glue and bakers twine, my garland was done.  And it turned out so cute!  I may keep it up all Spring!


The yellow and green work perfectly with my Lucky Picture Frame and Lucky Blocks, and it completes my decorations for St. Patrick's Day...at least for now.  :)

Briana

Thursday, February 28, 2013

Lucky Blocks

Last year I posted my Lucky Blocks that I made at my sister-in-laws house about two years ago.  I remember that it was two years ago because my daughter was about a month old or so and had colic really bad.  It was my first experience having a baby with colic and I wouldn't wish it upon anyone.  


I went to my sister-in-laws house and couldn't even finish making the project because of my crying baby.  So my sister-in-laws came to my rescue and finished them for me.  Otherwise, they would have never got done.  :)  Thank goodness for family! 

My sister-in-law got all the materials ready for us to make them.  She had the wood cut and paper and vinyl available.  We even mod podged glitter on the blocks as a finishing touch.  

Such a fun and cute project!

Briana

Tuesday, February 12, 2013

Valentine Subway Art

Valentine's Day is just few days from now and just sneaking up on me.  Yesterday, one of my boys made his Valentine Box for his school party and addressed all the Valentine's for his class.  He is super excited!

A week or two ago, my friend came over and we used my Silhouette to cut a bunch of vinyl.  She found this really cute Subway art at the Silhouette store, so we downloaded it and cut out three of them.  

 
She was so nice and put it all together for me.  She cut, sanded and painted the board, applied the vinyl and then mod podged over it.  Doesn't it look so cute!  I love the way it turned out.  My board has dark pink vinyl.  She did her's and another friend's in dark red vinyl.  

My house is starting to feel festive and ready for Valentine's Day!  How about yours?

Briana
  

Tuesday, January 29, 2013

Love Blocks

Valentine's Day is so much fun!  My daughters and I decided to do a little project with pink paper.  Their favorite color is pink, so they were so excited and asked me everyday for a week when we were going to use that paper! 


 My husband cut a 2x4 into various sizes and he even sanded it for me! (The largest block is 8 inches tall.)  It was so nice to have his help.  He works a ton of hours being a OB/GYN resident, so I love it when he is home.  I painted the blocks white and then we mod podged the paper onto the blocks. 

For the letters and hearts, I used my Silhouette machine.  The font I used was a one I downloaded called LoveNessTwo.  My daughters loved putting the vinyl on! We finished it off with some bakers twine.

 Such a fun project and looks so cute in my front entry way!

Briana

Wednesday, January 23, 2013

Valentine Banner

Last year I made a Valentine Banner with my Silhouette.  Since I moved this past year, I had to find a different place to put it.  There were two places that I was considering.  The first one was my front entry way (which is the one that I chose) and the other place was my fireplace mantel. 
  

I'm still in the process of decorating it.  I want to cut some vinyl and put some more Valentine decorations up, but it's a start.


I love reusing decorations and especially banners that take a long time to make.  Now to center all my decorations around my banner and it will look fabulous!

Briana

Wednesday, June 20, 2012

Popsicle Shirt

Last week we were given a challenge by the Wayward Girls' Crafts.  They give us one word and see what we come up with.  The word they gave us was: Popsicle.    They also did a spotlight on their blog that you can go and check out here.  


So I thought and thought about what kind of craft I could make that went along with the theme.  We made all kinds of pudding pops.  My husband's favorite was banana.  My daughter loved the chocolate.  And my boys loved the vanilla.  But I didn't want to go with the traditional "popsicle".  So I decided to make a shirt.

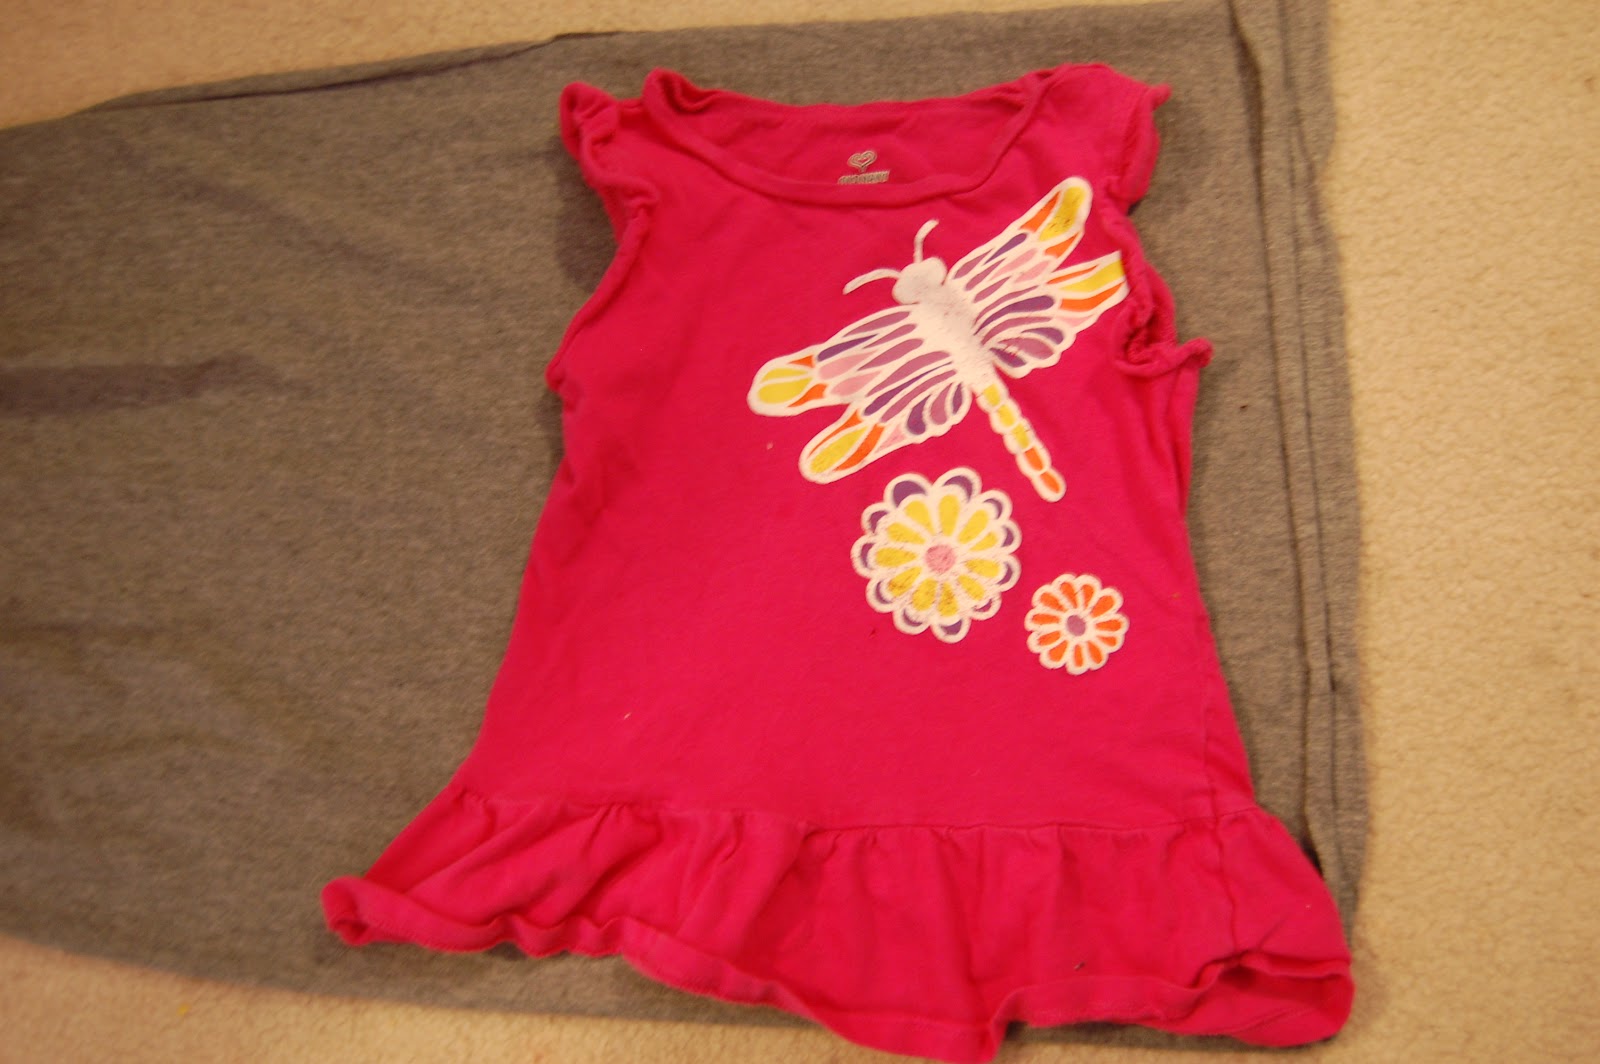
I didn't have time to go to the store to pick up a shirt and taking all my kids with me didn't sound like a fun trip, so I decided to sew one.  I picked up some grey jersey fabric on clearance months ago.  I knew that it would come in handy one day...and this was that day!

I took one of my daughter's shirts that fit her good and used it as a pattern.


I cut out a front (the one on the right) and a back (the one on the left.
This fabric is nice because it won't fray, which means that I didn't have to hem the edges.  I just sewed along the sides of the shirt and the shoulders.  I added a ruffled strips for sleeves. The neckline and bottom of the shirt are raw.  You can hem them if you so desire.  (This fabric can be challenging to sew, so just take it slow and you will do fine.)


Once I sewed the shirt, I made sure that it fit and then moved onto the fun stuff!

I had a sheet of hot pink with white polka dots iron on transfer material.  I cut out a popsicle shape, but before I ironed it on, I used a brown ribbon for the popsicle stick.  I sewed the ribbon on and then ironed on the popsicle part.  After it was cool, I sewed around the popsicle part.  (You don't have to sew the iron on transfer, but I liked the way it looks with stitching around it.)

I used my Silhouette to cut out the "So Sweet" part.  I found the saying in the Silhouette store.  I had dark pink heat transfer material that I used for the words. ** Make sure you mirror the image you want to have cut.  Before you iron it onto the shirt, put a thin piece of fabric over the part you are ironing. **


My daughter absolutely loves her Popsicle shirt and I love the price!

Tuesday, May 1, 2012

Recipe Binder


Bridget, one of our sisters, has an amazing collection of recipes that she has gathered over the years from cooking magazines.  Every time she would see a recipe that she wanted to try or one that looked amazing, she would rip it out from the magazine and put it in her recipe binder.

Well, I started gathering quite the collection of recipe magazines.  It was becoming a problem because I forgot what recipes I wanted to try in the magazines.  So they would just sit on a shelf gathering dust.  Every time I would see those magazines, I would think of Bridget and her neatly organized binder.  

I knew exactly what I needed to do...


I started out by getting a one inch binder.  I printed off the words "Recipes" and added it to come cute scrapbook paper.  

I used scrapbook paper to make my "dividers".  I picked different colors and patterns that coordinated somewhat.  

I used my Silhouette to make the tabs.  I picked the tabs through their online library.  Then I typed in the tabs what I wanted them to say.  I printed on my printer the tabs, make sure to print the registration marks.  Then I sent it through my Silhouette machine and cut them out.  And then tape them onto your sheet protector.


These are the tabs I used, but you can choose whatever and how many you want.

Appetizers
Breads
Breakfast
Side Dishes
Desserts
Main Dishes
Salads
Soup and Chili
Pizza and Pasta
Drinks


I'm loving my Recipe Binder.  I feel so organized.  It's so nice to go through all those fun magazines and take out the recipes I want.  Then I let my kids make collages with the rest of the magazine.  It's a win-win situation!

My kids also like going through the binder and picking out recipes they want to try.


And when I find a recipe online, I print it out with a picture and add it to the binder.  It's our go-to book in the kitchen!


Please take a moment to vote for us on Picket Fence! It only takes one click!  Thanks!

Monday, March 12, 2012

Junior/Senior Primary Jars


I was recently asked to cut some vinyl to put on our Junior and Senior jars for Primary.  I used my Silhouette machine to cut the white vinyl out.  So here they are. 


 In Primary, when we need to call on a child, we grab one of the sticks in the jar.  Each stick has a child's name on it.  We have a ziploc bag where we keep the names we have already called.    I thought the jars turned out so cute.  I can't take any credit for the decorations on them.  They were done by someone else, but I think they are adorable!

Also, vote for us on Picket Fence by clicking this button...

Thursday, March 8, 2012

Lucky Blocks

Here are some St. Patrick's Day blocks that I made with my Sister-in-laws last year.  One of my sister-in-laws gathered all the materials and then we had a fun party and put everything together one night. I actually didn't put my together, I had help from all my lovely sisters.  I had a very fussy baby last year with colic, and I think I cried the whole way home, but that's a whole other story!


We gathered together the supplies:
a 2 by 4 piece of wood that Home Depot cut for us
paint
Scrapbook paper
mod podge
and Vinyl that says LUCKY

Start out by painting the wood.  Let it dry and then mod podge the paper onto the blocks.  Once that is dry, apply the vinyl and you're done.  If you feel so inclined, you could add another coat of mod podge over the vinyl.  Fun and easy and oh so cute!


Don't forget to vote for us on Picket Fence!

Tuesday, February 28, 2012

Sweet Singing

For those of you who have been followers for a while, you may remember our Scripture Jar.
We used it in our Primary to count the number of kids who read their Scriptures for the week.  We would tally up the number and then add that many pom poms into the jar. 

Since this is a new year, we decided to use the jar for our Singing Time.  Our kids (ages 3 to 11) in Primary are not singing to their full potential.  So I labeled the jar "Sweet Singing" and whenever they are singing amazing, we will add treats to the jar.  We decided to add Starbursts.  

Once the jar is full, we will hand out the Starbursts to the children.  
They are looking forward to fill that jar!


Vote for us on Picket Fence by clicking this button!

Thursday, February 9, 2012

Valentine's Day Banner

So this Valentine's Day I wanted to make a banner to display in our home.  


I found the templete on the Silhouette Online store.  It is called Hearts Banner Layered.  So I used my Silhouette machine to cut out the shapes.  


I used various shades of pink and white paper and a cream ribbon to tie it off.
I love the way it looks with the pinks and whites!

Happy Valentine's Day!


Also, please remember to vote for us Daily!


Monday, November 21, 2011

Christmas Planner

Every year I keep a master list of Christmas presents.  I have to or else I will forget something or someone!  I just can't remember everything now a days. :)

So I came across this really cute idea for a Christmas planner from the Sisters at Eighteen25 and I knew that I had to make my own.  You can head over to their blog and check the printables for the planner and the full instructions.  I did a few adjustments as I made mine.

I used a notebook that I picked up on clearance somewhere.  It's about 6 x 7 inches.  I covered the front with Christmas paper.  I tied the ribbons on the wire rings on the side.  I did this only to cover up the purple background of the notebook that I couldn't put paper on.  If you look closely, you can see the purple under the ribbons. 


On the first sheet, I covered it with more paper and glued on a fancy envelope that I cut out using my Silhouette machine.  This is where my coupons go.


The second page has another envelope for the receipts.


Here's the tab that will take you to the master list.  No one is allowed to look here except me!  :)


As you can see, I glued Christmas paper onto the page that I attached the tab onto.  I just wanted to reinforce that page. 


Here is my calender.  You can find the printable on Eighteen25's blog.


And here is my To Do tab.  I will put my different ideas down, recipes, lists, etc.


And last, but not least, I covered the back of the book as well!  This was such a cheap project because I had everything lying around!


Now for the fun part!  Shopping...

Thursday, October 13, 2011

Scripture Dots

I was asked to put some vinyl on our Primary's Scripture Dots jar. 

All these little pom-poms are used for a reason.  Every week we ask the children if they read their scriptures every day for the past week.  If they do, then they get to add a pom-pom to the jar.  All the kids love it and get so excited to add to the jar!

The jar was simply decorating, with ribbon glued around the jar.   And the vinyl added the finishing touch!  

I'm thinking about using the same method to encourage my kids to do other things...


Vote for us daily!

Monday, October 10, 2011

Families are Forever Wall

I have been wanting to put my kids pictures on the wall for quite some time now.  I ordered my pictures from a company online that I love!  It's called AdoramaPix.  I always order my prints on Metallic Paper, and they always look great!  Once you go metallic, you will never go back!


I used my Silhouette SD to cut out some vinyl: Families are Forever.  I'm thinking about adding a flourish design to the empty corners, but haven't done that yet.

I had an extra picture frame, so I found this printable of the Family Proclamation.
I printed it out and then added a fourish that my Silhouette cut out in the lower right hand corner, but you could add anything there.
It worked out perfect and added that finishing touch!


Related Posts Plugin for WordPress, Blogger...