Wednesday, August 31, 2011

☆ Pay it Forward ☆

Here's the scoop!!!!

Andrea at sewdivertimento got us linked up with a Pay it Forward, blog style. If you aren't familiar with PIF here is what you do...

1. One of us will make a little something for the first 3 people who comment on this post. It will be a surprise and it will arrive when you least expect it. Please email us your address to babblingsandmore@gmail.com so we know where to send it to.

2. We will have 365 days to do it in. What's the catch? To get a handmade present from us, you will have to play too! This means YOU pledge to send a little handmade something for 3 readers of your blog. It doesn't have to be quilty - just handmade!

3. You must have a blog.

4. Once you comment here, you must post about your Pay It Forward on your blog to keep the fun going!

Who will be our 3? Can't wait to find out!


Tuesday, August 30, 2011

Lamp Makeover

I have been looking for a lamp to put in my daughters room.  I finally found one at a thrift store yesterday for $1.41. I have no idea where they got that price, but yes, $1.41.
After the makeover- the lamp is so cute and goes with Madi's room so well!!
Here is the lamp before, I know- not very girly.  It definitely needed a makeover. 
 I did not want to spend any money, so I gathered items around the house- 
Spray Paint, Hot Glue, Lace and Material
I started to make flowers out of the material and glue them on the lamp shade.  I did not really know what kind of pattern I wanted, so I just started making them and gluing them on.
Here is how I made the flowers...
Tear the material in about a 3 inch strip and tie a knot at the end.
Twist and glue the material as you twist it around the knot.
Keep twisting and gluing until you get the desired size of the flower.
Here is what the lamp looks like after.  I spray painted the base of it white and added flowers all over the lampshade.
Before Makeover
After Makeover

 My daughters room with the lamp in it.

Sunday, August 28, 2011

Homemade Cinnamon Rolls

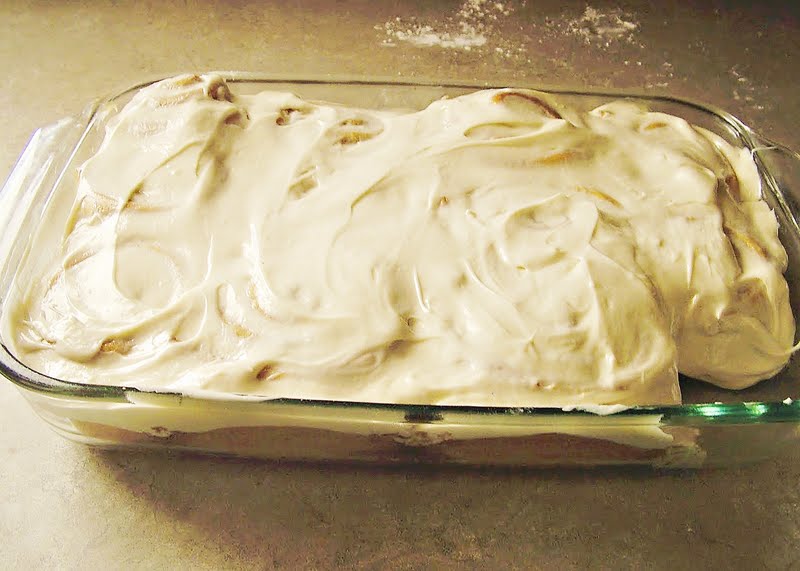
These cinnamon rolls were so good, I decided to share. The bread recipe:

4 1/2 tsp. Yeast
2 Cups warm Water (105-109 Degrees)
1/2 Cup Sugar
2 tsp. Salt
1/2 Cup butter shortening (you can find this in the baking isle, it is butter flavored shortening)
6 1/2 Cups flour
2 Tbs Augason Farms Dough Enhancer (optional)

Cinnamon Filling:
1/2 butter (softened)
Cinnamon (to taste)
Sugar (to taste)

Dissolve the yeast in the warm water. Let the yeast bubble. Then add the sugar, salt, shortening and 5 cups of flour and mix. Add the remaining 1 1/2 cups of flour and the dough enhancer. Knead for 6 minutes. Roll out the dough and add the cinnamon mixture. It should be creamy and easy to spread. Start at one edge and start rolling the dough.  After rolling, cut about every 2 inches.  Put the rolls into a greased pan and let them rise for about 45 min. Bake at 375 for 25-30 minutes.

* The dough Enhancer makes the rolls so soft. They will stay soft for days. You can find it in the food storage section at Walmart.
** This recipe is also good for dinner rolls.


Cream Cheese Frosting by Briana:
1 Pkg of Cream Cheese (soften)
1 Cube of Butter (soften)
1 tsp Vanilla
Powered Sugar

Mix the cream cheese and butter until well mixed. Mix in vanilla. Add in powdered sugar until desired consistency.


These are so yummy. My husband couldn't wait until they were frosted. That is why the corner one is gone.

Saturday, August 27, 2011

Attention: All Scrapbookers!


Welcome to the Family! from Lisa Jurrens on Vimeo.


Here is an awesome video from My Memories! It is Digital Scrapbook Software! It is such a great program, and Easy one to play with, if you love to scrapbook! Check it out! They have much more creative ideas to play with for those who like to scrapbook! Many people think all you can do is make scrapbook templates, but there is so much more!

Here’s what’s on the video –

· Software Screen Tour – finding your papers and embellishments.

· MyMemories.com website tour (and description of different types of products on the site)

· Introduction to SOME of the tools (and references to the other video tutorials that are available)

· Beginning information on album creation

Check out the scrapbook page that I made below. It was so fast and easy to make! The hardest part was to hunt down the pictures of my sisters. Their program is so easy to use and has so many cute backgrounds and embellishments to make your scrapbooks absolutely Darling! This program is for both the Rookie (thats me!) or Advanced Scrapbookers! Check them out at MyMemories.com!


We want all our visitors to take advantage of the great deal of getting $10 off the software and $10 in free merchandise from MyMemories.com!! Enter this promo code when you check out!


STMMMS11269

(Make sure to copy and paste the link to avoid any typos!)

Follow the My Memories Blog!

Like them on Facebook!

Tweet on Twitter!


Thursday, August 25, 2011

Sugar-Free Banana Bread


One of my good friends has diabetes and is currently in the hospital.  I decided to make him some banana bread and go visit him.  I have not worked with much sugar-free stuff, so to my surprise the banana bread turned out amazing!  I used the Martha Stewart recipe here and just made it sugar-free.


 Heres the recipe I used...

Ingredients

  • 1/2 cup (1 stick) butter, at room temperature, plus more for pan
  • 1 cup Splenda
  • 2 large eggs
  • 1 1/2 cups unbleached flour
  • 1 teaspoon baking soda
  • 1 teaspoon salt
  • 1 cup mashed very ripe bananas (about 2 bananas)
  • 1/2 cup sour cream
  • 1 teaspoon vanilla
  • (optional) 1/2 cup chopped walnuts or pecans

Directions

  1. Preheat oven to 350 degrees. Butter a 9-by-5-by-3-inch loaf pan; set aside. In an electric mixer, cream butter and splenda until light and fluffy. Add eggs, and beat to incorporate.
  2. In a medium bowl, whisk together flour, baking soda, and salt. Add to the butter mixture, and mix until just combined. Add bananas, sour cream, and vanilla; mix to combine. Stir in nuts, and pour into prepared pan.
  3. Bake until a cake tester inserted into the center of the cake comes out clean, about 1 hour 10 minutes. Let rest in pan for 10 minutes, then turn out onto a rack to cool.


Wednesday, August 24, 2011

Flower+Barrette=Adorable

Remember the fabric flowers from this post?  Well, I had some extra and I thought a flower barrette would look so cute.  So, this is what I did...

I decided to leave the netting on the back this time.  I thought it would add that little "umph" (is that even a word?). 


I gathered the back together so I could fit more flowers on the barrette. (And yes, I did poke myself with the needle right on my thumb.  Ouch!)


I covered the barrette with ribbon.  I also heat-sealed the ribbon.


Then I just glued on the flowers to the barrette.  Easy and simple!


Here's what it looks like on a barrette.  I think that I will have to borrow it from Little Lacey!


And it matches the shirt perfectly!


Monday, August 22, 2011

Homemade Laundry Detergent


1 laundry bar, any brand, grated up finely
1 1/2 cups Borax
3 cups Washing Soda
After you have grated the laundry bar, combine the Borax and Washing Soda in a large bowl.All you need is 1 Tablespoon of the detergent for a normal size load. If you have heavier soiled clothes or a larger load use 2 Tbs. Be sure to store it in an airtight container, which I use used icecream or licorice buckets. Works great and love to recycle containers.

There are only 3 ingredients in this laundry detergent. No fillers or harmful chemicals in it. You know exactly what is in it! You can find all the ingredients in the same soap isle. Use any brand of laundry bar that is avaliable. It really has no fragrance in it either. But if you want your laundry to smell pretty you can add a few drops of essential oils to the water. You can buy a 2 year supply of detergent for under $50. How about that kind of savings!

Friday, August 19, 2011

End Table Find

Here is a little find I picked up at a yard sale a few months ago.  I am in the process of refinishing it.  Stayed tuned...

Cats

On the way home from the store today Chisolm said, "Mom, I see a cat and its not dead!" humm, he must see alot of dead cats...

Thursday, August 18, 2011

Out of the mouths of Babes

Mayley came up to me and gave me a hug. She then looked up at me and said, "Mom you smell good." I said, "Thanks, what do I smell like." Mayley, "Jesus."

Flower+Shirt=Cuteness

I have a few shirts that have fabric type flowers on them.  Every time I wear them, Lacey (my 2 year old) always says she wants a shirts with flowers.  So, I decided to make her one.

She had a plain white shirt that I found for her.  Then I went to Hobby Lobby and bought some pre-made flowers that come on netting.  You get them in the fabric section where they have their ribbon and you by it by the yard.

I cut the right amount for the collar of the shirt and trimmed away the netting.  Then a few minutes of hand sewing and it was all done.  So cute and she LOVES it!  I think I will have to make one for myself!


Wednesday, August 17, 2011

Double Vanilla Homemade Ice Cream

Everyone loves a good homemade ice cream? Don't they?  Well, this is the one that I like to use and we make ice cream ALL the time and LOVE it!

Try some ice cream on top of the Golden Bars.  So delicious!

Double Vanilla Homemade Ice Cream

2 eggs
1/2 cup sugar
1 small package vanilla pudding
2 cups heavy whipping cream
1 cup whole milk
1 tsp. vanilla

Now I like to mix the eggs, sugar and pudding with 1 cup of cream for a few minutes until it gets whipped up really good and then add the rest of the ingredients.
Freeze according to your ice cream mixer instructions and ENJOY!

Tuesday, August 16, 2011

Safe Homemade Pet Powder


Pet Powder
Don't enjoy that 'wet dog' smell? Try this non-toxic powder.
1 Cup Corn Starch
5 drops Lavender
5 drops Geranium
4 drops Eucalyptus
Mix well, and keep in a small Pringles can (or other can/glass with lid)
with several holes in the top. Sprinkle a small amount on your dog or pet
and brush through the coat. Will not only smell great, but repels ticks and other
pests.
Use after bathing, trimming or when needed. Keep airtight between uses.

Look what I have!

I have this picture, among a collage of other pictures, hanging in my room. It is one of my favorites. This was taken at our brother John's High School Graduation. Brooke was newly married and had braces, so does Brittany, ha ha! I Love my sisters and Mom! But I have one question, How come I am a whole head taller than all of them?...

Monkey Bread

Yemp, these are Super Yummy, and so easy to make! (and its the same dough recipe as the Super-Duper Pizza Dough recipe coming soon!)


Monkey Bread

1 envelope Dry Yeast (2 1/4 tsp)
1 tsp. Sugar
3/4 c. luke warm Water
1 3/4 c. Flour
1/2 tsp. Salt


Mix the yeast, sugar and water. Let it bubble. Then add the flour and salt. Beat for 5 min.
Once the dough is made, pinch off little balls about 1 in. big.

Now you need to prepare 2 bowls:
Melt about 1/2 stick of butter in a bowl.
In another bowl mix 1/2 cup sugar, 1 Tbs. cinnamon, cloves, allspice, ginger, nutmeg or what ever spices you love to combine with cinnamon.
Dip the balls first into the melted butter, then roll in the sugar mixture. Place the sugar-coated balls in a 8 x 8 greased pan. Let the balls rise for 10 min. Bake at 350' for 10 min. Drizzle frosting on the warm Monkey Bread to let it melt into the cracks. Yummy!
Frosting
2 oz. Cream Cheese
2 TBS. Butter
1 tsp Milk
1 tsp Vanilla*
Powdered Sugar
Whip together the cream cheese and butter. Add the milk and the vanilla to make a little bit runnier. Slowly add powdered sugar to the mixture until you have the consistancy you want, or until it tastes good.
(*I added a 1/4 tsp. of Maple Extract to the frosting instead of Vanilla to make a good "breakfast" flavor to it also)

Monday, August 15, 2011

Golden Bars

Mmmm!  Just looking at these pictures make me hungry!  I haven't made these for so long I almost forgot about them.  This recipe comes from Ma, our Dad's mom.  My mom used to make them all the time when we were growing up and they are so tasty!  I don't remember her adding the nuts, but I thought they were great!  They were gone in no time...

This is so easy to make!  My kids had so much fun making it!  
Now they want to make their own cookbook!  I think they should go for it!  :)


So tempting!  They are perfectly moist and delicious!  My mouth is watering as I type!

Topped with some Double Vanilla Homemade Ice Cream (Recipe to be posted later).


Golden Bars
Ila May Porter Reed

1 1/2 cups of flour 
1/2 tsp. salt
2 tsp. baking powder
2/3 cups of butter
2 cups of brown sugar
2 eggs
2 tsp. of vanilla
1 cup of walnuts
Preheat oven to 350 degrees and grease 9 by 13 inch pan.
Sift flour, baking powder and salt and set aside.  Melt the butter then stir in brown sugar, eggs, vanilla. Then add the flour mixture and nuts.  Mix.  
Bake 25 to 30 minutes in pan.
Cut in squares while still HOT!

So easy!  You have to try!

Saturday, August 13, 2011

Do T Do Winner!

Congrats 4mleyneks! You won our drawing! I'll be sending you a bag of lemon drops. Send your address to our email- do.t.do@hotmail.com

Friday, August 12, 2011

Do T Do

****This giveaway is now closed**** 


Ok, I know its not healthy to brag but I can't help it. ;O) But, I have an Etsy shop that I opened up at the beginning of the year. And I just recently made my 200th sale! Whoo hoo! So to celebrate, on my Do T Do Facebook page I am having a giveaway on Friday. To enter, just leave a comment on my post of what flavor you would like to try in my etsy shop. The winner will be selected randomly and sent the flavor they wanted to try. How easy is that?! Fun stuff! Can't wait for this little business to grow.

P.S. Thanks Brooke for all the help you've done with my shop as well!

Gourds

Ok, you may think its kinda crazy but I wanna make some Halloween Gourds! I LOVE these things. I may have found a new hobby. "Honey, bring out your power tools, cause I want to make some scary faces!"
Come on, I know you think these are super cute... these are from Pinchmeboutique on Etsy.
Cant wait for Fall!


Cute Snowmen too!


Thursday, August 11, 2011

What a Flower!

Having girls is so much fun!  Here is a picture of one of the flowers I made for my daughters.  I found the flower at Hobby Lobby.  I hot glued a few small gems to the center of it and added a hair clip. So fun and big, perfect for a crochet hat!


Wednesday, August 10, 2011

Potty Training Jar

My daughter, Lacey, is at that age where I think it's time to do a little potty training.  I have two little girls in diapers: Lacey (2 years) and Daisy (7 months).  Eliminating one more person to buy diapers for is very motivating, but maybe not for her.

So I had this jar lying around from IKEA, so I decided to make it into Lacey's Potty Jar.  I used my Silhouette SD, which I LOVE!  And I used some hot pink vinyl.  With some ribbons on the handle, we were ready to go!


She was very motivated to "go" because she was able to get a treat afterwards.  Even my older boys tried to convince me that they needed a treat also.  But I didn't give in that easily!  And all the hard work has paid off!  Lacey is doing great and is POTTY TRAINED!  Yea!

Monday, August 8, 2011

Mason Jars

I was over on Oopsey Daisy's Blog and found these cute mason jars.  I thought they would be so cute for a wedding reception or in your house or for a gift!  Aren't they adorable?  Go and check them out!


Highchair Redo

So here is a highchair that I found at a yard sale for $2.  I love the fact that I can put it on one of my other chairs and not have the bulky highchair taking up space in my kitchen.  And the wood matches my table and chairs.  I just wasn't very fond of the fabric.  So I decided to recover it to match my kitchen!

Before
I just took the original cover and used it as a pattern.  I cut out sections, making sure to cut out enough room for seam allowances.  And then added the pieces together.  I love the colors and fabric! 
After

Related Posts Plugin for WordPress, Blogger...