Showing posts with label Halloween. Show all posts

Wednesday, October 22, 2014

Spider Cookies


We are getting ready for Halloween over here.  The kids are getting costumes ready.  Just last night, my 12 year old son sewed his own bat costume.  He basically sewed wings together to tie to a shirt.  Pretty clever and simple.  

Here are some fun Halloween cookies that taste so yummy!  These would be great for a Halloween party!  My kids absolutely love these cookies and try to wait patiently for the chocolate to harden.  These are super easy to make, they just take a little bit of time, but totally worth it and the kids love to help!


Peanut Butter Spider Cookies

Ingredients:
Ritz Crackers
Peanut Butter
White Almond Bark or White Chocolate
Black Colored Chocolate (found at craft stores)
Wax Paper
Ziploc Bag 

     Make a sandwich out of the crackers and peanut butter.  Melt the white chocolate.  Dip the sandwiches in the white chocolate.  Set on wax paper to dry.  

Melt the black chocolate and put in a ziploc bag.  Cut a small corner off the bag.  Make your spiders and let dry.  Enjoy!


Briana

Tuesday, October 30, 2012

No-Sew Tulle CINDERELLA Dress!

I recently bought Cinderella on DVD for my daughter.  She has been completely obsessed ever since!  So for Halloween she of course wants to be Cinderella!
 
 
This was such an EASY dress to make.  
You need:
 15 yard of Light Blue Tulle 
2 yards of White Tulle
Waffle Headband
A Blinged Out Hair Clip 
Crown
 
 
What I did was cut the Tulle in 6 inch strips and ran it through the waffle headband.  When the headband was in the middle of the tulle, I tied the tulle in a knot around the headband.  I used the same technique to make the sleeves.
 
 
 To cover the waffle headband, I put the dress on my daughter and wrapped the tulle around the headband then I put the hair clip on it to keep it in place.  
Your done!
My daughter absolutely LOVES her dress!
Briana made a similar dress for her daughter but in pink- check it out HERE!
Brooke

Thursday, October 25, 2012

Winkerdoodles: Blowfish Pumpkin

Today we have a fabulous guest post from Deena over at Winkerdoodle's World of Whimsy.  She is going to show us how to make a Blowfish Pumpkin.  You really have to see this one!  But first, let's learn a little about Deena.

****************************************************

Hi Babblings Friends! 

My name is Deena and I blog over at Winkerdoodle's World of Whimsy (http://winkerdoodles.com). My blog is a place where you can get some awesome recipes for easy and delicious sweets and EASY dinners. We're all busy... why not let me help you find something yummy for dinner... AND DESSERT!  (I mean... who doesn't need a little "Sugar Therapy") I also share some fun and unique ideas for crafting for holidays. Oooo... we've got some really NEAT things coming up!!!

Today, I'm excited to share a fun and unique idea with you for Halloween. 

Is there a Halloween pumpkin carving contest at your office? Wanna win?? Then you've got to try this! 
I've made a fun pumpkin and, though it's a bit time consuming, it's really fun and looks awesome! You will be the winner of any contest... HANDS DOWN!


Blowfish Pumpkin

You will need:

  • 2-3 bags of candy corn
  • hot glue gun and glue sticks
  • small "silica" packets (the ones that say "do not eat" when you buy shoes, etc.)- Optional
  • sturdy base to put your pumpkin on (I covered a round cookie sheet with foil)
  • a drink holder from a fast food restaurant. (You could use anything... but this made it easier to turn
  • Cardboard or poster board cut into "fins" and a tail. (I went one step further and made mine out of sugar... but, the moisture from the pumpkin melted the candy after a while. Cardboard or colored poster board will work great. 
  • brown paper sack
The Process

Begin by cutting a hole in the BOTTOM of your pumpkin and cleaning out the contents. Now, cut out two eyes.  I left a section of the eye and colored it black to look like the blowfish is looking off to the side. (see picture). Before you color the eyes... clean the outside of the pumpkin with an all-purpose cleaner, like 409. 

Now, you will want to cut out slits in your pumpkin for the tail and fins. Test the fit and make sure the fins and tail will fit in the slits after putting hot glue on them. (Make the slits a little roomy) Set the fins and tail aside. Don't put them in until the end. Your pumpkin will want to "ooze" like pumpkins do... and it will get all over your fins and tail. 

At this point, you'll want to turn your drink holder upside down and cover it with your crumpled brown paper sack. This is your stand. Place your stand on your sturdy base. Use hot glue to attach the stand to your base. (Again, I covered my round baking sheet with foil and glued to that). Color your eyes black, if you do your eyes like I did.

Now... the FUN part. Heat up your glue gun and begin attaching candy corn in rows on your pumpkin. This will take a while, so relax and have fun with it. It's neat because you can see your pumpkin transform into a blow fish in front of your eyes. 


Just keep going until your entire pumpkin is covered. When you're done,  cover the ends of your fins and tail with hot glue... one at a time... and insert them into the blow fish. 

YOU DID IT! Now, take photos of your pumpkin blowfish and carefully transport it to your pumpkin competition!! Soak up all the praise! 

Thanks again for letting me come and show you a fun Halloween craft! Please head over to my blog and check it out! I'd love to have you join me as we explore lots of new and fun ideas for the holidays! We've got LOTS in store!!! 


*****************************************************
 
Thanks Deena!  Your pumpkin is fantastic!

Briana

Tuesday, October 23, 2012

Halloween Costume: Pink Princess

My daughter absolutely loves the color pink!  

So when I asked her what she wanted to be for Halloween, she said she wanted to be Little Red Riding Hood after seeing some really cute costumes. Boy, was I surprised!  But, she quickly changed her mind after I told her the story of Little Red Riding Hood.  I was disappointed because I love the color Red and I thought the costume would be sooo cute!

So...we looked at more Halloween costumes and she said that she wanted to be a Princess, a Pink Princess.  Now that sounds more like my girl.  I thought maybe the pink phase wore off, but I was wrong.


Now this was a no sew costume, for the most part.  I added some flowers and I hand stitched those on, but it wasn't necessary.  And I suppose gluing the flowers would have been faster, but I added a small pearl to the center of each flower and quickly stitched it on.


I used 5 yards of light pink tulle and 5 yards of white tulle.  I cut the tulle into 6 inch strips  and then tied a knot around a "waffle" headband that I used for the bodice.  The sleeves were also made of tulle.  I just took two strips and stuck it through the tulle and wrapped it around the bodice and then tied the ends at each side (under her arms) so the sleeves are adjustable.

Easy enough and absolutely darling!  Now all she needs is a crown and we are good to go!

Briana

Monday, October 22, 2012

Hand-Print Pumpkins

On Friday, I posted a fun pumpkin painting activity that I did with my children- Glitter Pumpkins.  Here is another pumpkin decorating activity that we did...
Hand-Print Pumpkins

This activity was just as fun, but it did required more work on my part- helping my 2 year old with her hand-prints.

I had my children pick out their pumpkins from the garden.  Then we used Martha Stewart Pearl Paint, you can find it here...  I actually really liked this paint and the consistency of it.  It made this project a whole lot easier having paint that went on the pumpkins nice!
 
 My children just did hand-prints all over the pumpkins.
 
 
 We let them dry and we were done.  FUN and EASY- my kind of project!
 

What kind of pumpkin decorating activities do you do with your kids?
Brooke

Friday, October 19, 2012

Glitter Pumpkins!

This was a really fun activity for my children!  
My children LOVE painting and LOVE pumpkins, so this activity is PERFECT for them!
GLITTER PUMPKINS
We actually grew these pumpkins from our garden and my children picked which ones they wanted- which was really fun.
  I got the glitter paint at JoAnn's.
Here is a link to the paint on Amazon.
I just put some of the Glitter Paint on a plate and had my kids paint the pumpkins with their hands.  
They LOVED smearing the paint everywhere!
 After they were done painting, we let the pumpkins dry overnight.
This was a SUPER cheap and FUN activity for my children!!
They LOVED it!


Brooke

Monday, October 15, 2012

Spooky Ghosts

A few weeks ago, our family made a few spooky ghosts to put on our front porch.  It didn't take very much time and was really easy.  Everyone loved this project!  My 1 and 3 year old even got involved, with the help of Dad. 


Materials:
Cheesecloth
Liquid Starch
Items to form the ghosts, we used plastic cups and foil

Put the liquid starch in a bowl.  Drench the cheesecloth in the liquid starch and wring out.  Form the cheesecloth into desired shape and let dry.  

We did this in the evening and the kids were so excited to run outside and see their ghosts all dried and ready to spook a few people.

Just a note: if the ghosts get wet, they will lose their shape.  A few of our ghosts got hit by a rainstorm and "melted" if you will. :)


Briana

Wednesday, October 10, 2012

Pumpkin Brains Popcorn

Here is a quick and easy Halloween treat that taste so YUMMY!

It's a sweet and salty snack we like to call Pumpkin Brains!

First, pop some popcorn.  Any kind of popcorn will do.  Try to remove as many of the unpopped kernels as possible.   (No one likes to bite down on those kernels. )  :)


Now in most craft stores, you can find melting chocolate.  I saw that Micheals had some orange Wilton's melting drops.  Those work perfect!


Just melt them in the microwave.  I like to do it in 30 second increments and stir in between.  It doesn't really take that long.


It works best if you put the melted chocolate in a ziploc bag and cut a small piece of the corner of the bag off.  Then drizzle all over the popcorn.  (I have also melted the chocolate in the ziploc bag before, you just have to really watch it and knead the bag every 30 seconds.)


After the chocolate dries, bag up the popcorn and attach the label.  So quick and easy and super cute!


Here is the printable.  Right click and "save image as" to your computer then print.  Enjoy!

Tuesday, October 9, 2012

Chicken Scratch NY: Spiderweb Votive Holders

Our next guest post is from Alecia.  She will be showing us how to make some really cute Spiderweb Votive Holders. But first, let's get to know Alecia...


**********************************************

Hello Babbling and More readers!

My name is Alecia, I blog over at ChickenScratchNY.com about crafting and life surrounded by livestock, and did I mention I got married September 29th?


I love to decorate for the holidays and Halloween has always been my favorite!I've shared several spider projects, from the very large lawn spiderwebs with giant spider warning signs to the smaller embroidery hoop web art and hot glue spiderwebs.

Like most of my crafts today's project is quick and simple. Personally, I think it's pretty too!


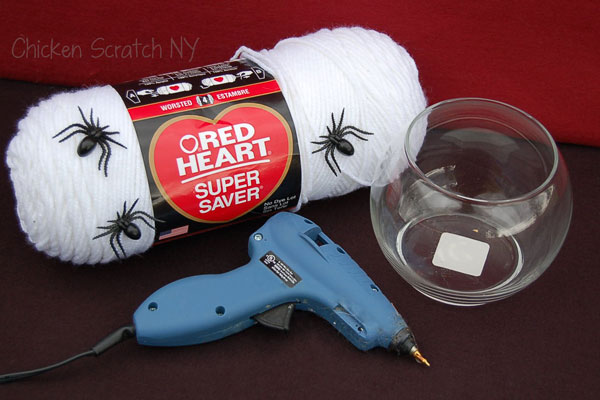
You probably have most of the supplies on hand, if not everything is easy to find. You will need: a glass vase (mine are from the dollar store), white yarn, hot glue gun and small fake spiders.

Tie a small knot in the end of the yarn, clip off the end and hot glue to the knot to the vase. You might want to use a pencil to push the yarn into the glue without burning your self. Keep gluing and wrapping, eventually the yarn will stick to itself and you won't need to glue every 4 inches. When you are finished stick the yarn in a blog of glue and once it's hardened clip of the rest of the yarn.
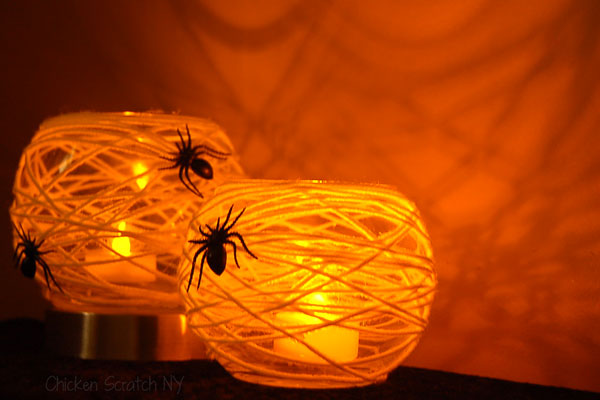
Finish up by gluing on a few spiders. Add a fake tealight and you're good to go with a creepy spider votive holder! They leave pretty cool shadows on the wall too.


On the off chance that you don't love arachnids you could always add a pair of googly eyes instead and have a mummy candle holder.

I hope you like what you've seen and I'd love to see you stop by Chicken Scratch soon!
I've got a Halloween Link Party going on right now so if you're in the mood for more Halloween fun check it out:


*************************************************************

Thank you Alecia!  My kids will love to do this project!
Related Posts Plugin for WordPress, Blogger...