Showing posts with label Fall. Show all posts

Thursday, November 15, 2012

A Mrs. and A Mama: Pumpkin Rolls

We have another fabulous guest post today!  Jen from A Mrs. & A Mama is here to show us how to make Pumpkin Rolls.  But first let's get to know her...
************************************************
Let me start off by thanking the girls at Babblings & More for giving us the opportunity to be their guest today. I'm Jen; my mom and I recently started A Mrs. & A Mama as a way to motivate us to accomplish our creative projects that we are always dreaming up but not always following through with. We enjoy crafting, sewing, and baking and are usually chasing my two toddlers around all at the same time. Please take a moment to stop by our blog and see what we have going on each day from home decor projects to food adventures to time with our family.

With the holidays quickly approaching I am already getting requests to bake a few of my pumpkin rolls. I was a little intimidated the first time I attempted this recipe but the results turned out amazing and now each cake I bake turns out better than the last.

Ingredients:
Cake
  • Powdered Sugar to coat tea towel
  • 3/4 C. flour
  • 1/2 tsp. baking powder
  • 1/2 tsp. baking soda
  • 1/2 tsp. ground cinnamon
  • 1/2 tsp. ground cloves
  • 1/4 tsp. salt
  • 3 large eggs
  • 1 C. granulated sugar
  • 2/3 C. pumpkin puree
  • 1 C. walnuts, chopped (optional)
Filling
  • 1 pkg. (8 oz.) cream cheese, at room temperature
  • 1 C. powdered sugar, sifted
  • 6 T butter or margarine, softened
  • 1 tsp. vanilla extract
Preheat oven to 375° F. Grease 15 x 10-inch jelly-roll pan, or a cookie sheet with fairly tall sides; line with wax paper. Grease and flour paper; be sure to do this thoroughly because you will want the wax paper to peel away from the cake without tearing it. Coat both sides (yes, both) of a thin cotton kitchen towel with powdered sugar.

Combine flour, baking powder, baking soda, cinnamon, cloves and salt in small bowl. Beat eggs and granulated sugar in large mixer bowl until thick then beat in the pumpkin. Stir in flour mixture.

Spread evenly into prepared pan. Sprinkle with nuts.

Bake for 13-15 minutes or until top of cake springs back when touched. Remove from oven and place sugar coated towel over the cake then place a cooling rack on top of the towel and flip over removing the cake from the pan. SLOWLY peel away the wax paper being careful not to tear the cake. Roll up the cake and towel together (the cake will actually be rolled inside of the cake, strange, but trust me).

Let the rolled up cake and towel cool on wire rack.


Beat cream cheese, powdered sugar, butter and vanilla extract in small mixer bowl until smooth. Carefully unroll cake. Spread cream cheese mixture over cake.


Reroll cake.


Wrap in plastic wrap and refrigerate at least one hour before slicing. I like to slice the ends off before presenting it, to clean it up a bit (also, because I love to sneak a taste). If you like you can dust the cake with powdered sugar but I find that the rolling process leaves a lot of powdered sugar on the cake already, but it’s your choice. I also have a few family members that like it with whipped cream too.

Are you a pumpkin fan? Take a stop by our blog, I am pumpkin obsessed and have already tried 5 other pumpkin recipes this season. Enjoy!

******************************************

Thank you Jen!  My mouth is seriously watering.  I have been craving pumpkin rolls and this recipe will do the trick!  Now everyone head on over and check out all the other pumpkin recipes these ladies have at A Mrs. and A Mama...you will not be disappointed!
Briana

Thursday, November 1, 2012

Love It Sew Much: Fall Scrappy Table Runner

Today we have Julie guest posting from Love It Sew Much .  You are all going to love this tutorial!  But first, let us learn a little about Julie...

**************************************************

Hi my name is Julie Snow.  I am thrilled to be guest posting here today!  I run a sewing business called "Studio Julie Snow" out of my home where I do custom clothing, sewing lessons, alterations, costumes and home decor.  I started my blog "Love It Sew Much!" almost a year ago as a showcase for my client projects and a creative outlet for me!  I also post updates on my sewing classes, showcase my students' projects, and share fun sewing projects and tutorials that I love!  Feel free to visit!


 This table runner could be a casual and pretty addition to your Fall table settings!

And if you do not want to go out and buy a bunch of yardage to make a table runner, this is perfect because it just uses a neutral base and SCRAPS!

 I got inspired by a craft I made last year!  (And this one was inspired by my friend over at Landee See Landee Do)  Fabric balls are made from skinny scrap strips of fabric - they are wrapped around a styrofoam ball and pinned into place.  So simple!  I love them!

 So I had a bunch of those strips left over ( I think I was waiting for another coupon to go buy more styrofoam balls...)  But this year I had a great idea how to use these strips in another way!


 I happened to have an approximate yard of 45" wide black fabric in my fabric storage, so I used that for my base.  I laid it out with selvages together and cut it in half along the folded edge.
You could make your table runner to any dimension you need to fit your table surface.  This is just what I had and it will fit my table pretty nicely.

 Then I took one of the halves and cut it in half.  I centered the larger piece in between the two I just cut in half.  Then I sewed them right sides together to form my long table runner base.

(So my finished table runner will be approximately 2 yards long when all sewn together.)

 Now to my strips.  These strips were simply cut along the width of the fabric in about 1" increments.  It hardly takes any yardage at all if you did want to go buy some and make scraps.  But this is what I had leftover from making fabric balls.


I cut them all exactly in half.  Because that happened to line up to my table runner base (remember I cut it in half too?)  Then they fit perfectly from edge to edge.
I lined them all up in an arrangement that I liked.  I made sure I left the center section blank so I could add centerpieces, etc.   
 Then I pinned them all into place.  One pin at the top, middle and bottom.  You could do more if you like.


 Then I rolled up one side and pinned the whole side down.  This will keep that whole section out of the way while I sew the unrolled-up-side strips down. 


 Then I just stitched all those strips down!  Yes, I left the edges raw!  It gives it a rustic cool look that I really like.  I made sure I backstitched at the beginning and the end of my strips.

(If you prefer a cleaner edge - you could turn the raw edges under and press them before you stitch them down).


 You can see on the right that I rolled my edges that were done over to the left as I went.  Keeps the bulk out of the way.  Very handy.


 When all my strips were finished getting stitched into place, I laid it on the table and cut off the ends to make it all flush with the raw base edge.  

 Now all you have to do is hem the edges of your table runner!  Turn them all under 1/4" or so.  Press in place.  Turn again the same amount.  Press.  Pin corners in place so they are nice.

 Topstitch that hem!

 Here is what the hem looks like when you are all done sewing!

Then I threw it in the washer and dryer.  This fluffed up my ragged edges and made them nice and frayed.


I trimmed off a few off the raggedy edges, but only the ones that were a little tangled.  You can decide how much you want to trim off, but go easy on it - remember it's meant to be a little frayed!


Here's how I left my edges.  Nice and a little frayed.  Now press it with your iron!  This will make it nice and crisp and pretty!


You are finished!  Now go add it to your table and accessorize it!


I just love this Fall addition to my table!


And here is the new home for my fabric balls this year!


Do you have any fabric scraps you can use?  


Thank you for joining me today here at Babblings & More!  Feel free to visit me at LoveItSewMuch!  Hope to see you there!
********************************************************


Thank you so much Julie!  I love the table runner!  I really need one of these on my table!  Now everyone go and check out her blog...You won't be disappointed!


Briana

Tuesday, October 2, 2012

Fall Fireplace Mantel

We just recently moved into a new house last month and it has a beautiful fireplace mantel.  I am so excited to decorate it throughout the seasons!

I just love Fall and all the colors, along with the beautiful cooler weather we enjoy.  So I am so delighted to decorate to fall!

I picked up the garland and pumpkin at Hobby Lobby over the past few years when they clearance out their old decorations.  I was given the candle holders from my wonderful sister-in-law.


I picked up some letters at Jo-ann's and painted them black a few years ago.  And the star I found at a yard sale.


I just love the new look and the new house!
Now off to decorate the rest of the house...

Briana

Tuesday, September 6, 2011

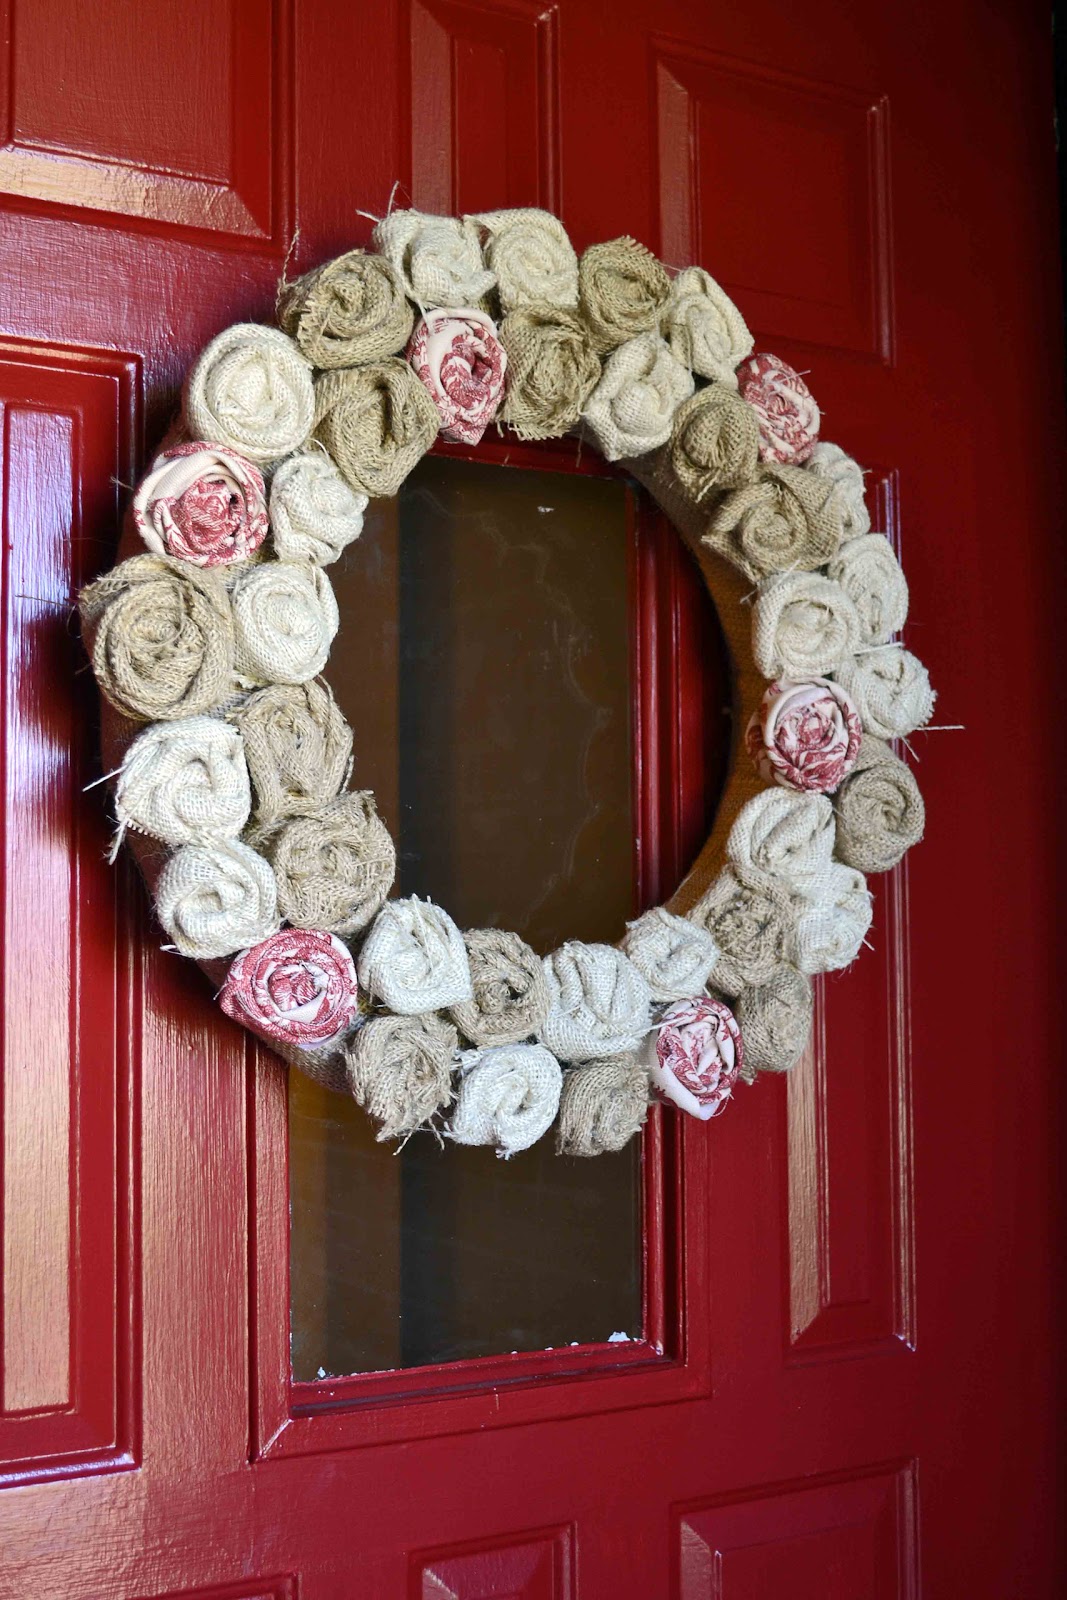
Burlap Wreath


So recently I have redone a lamp with flower on the lamp shade and burlap curtains.  I am definitely on a kick right now, so I decided to combine both projects into a wreath.  I made a flower burlap wreath.
Here it is...


Materials Needed:
Foam Wreath- I used a 14" one (purchased at Hobby Lobby)
Burlap- 1 yard of darker burlap and 1/2 yard of lighter burlap.
Contrasting Material- Just to add a hint of color
Scissors
Hot Glue Gun and Sticks
Pins


Step 1- Cut the Burlap into strips and start to wrap it around the wreath.


Step 2- Pin the Burlap in place. 


Step 3- Wrap the entire wreath with the burlap.


Step 4- Make flowers as shown HERE and glue them onto the burlap covered wreath.


Step 5- Hang on your door or wherever you want to put it!


Related Posts Plugin for WordPress, Blogger...