Monday, April 30, 2012

Baked Garlic Butter Zucchini

 Here is another recipe using Chef Shamy Gourmet Garlic Butter.

Baked Garlic Butter Zucchini
Ingredients
1 Zucchini
1 Yellow Squash
1 Tomato
a handful of cheese

Directions
Cut up your zuchini, yellow squash and tomato and put in a greased pan.  Add your cheese.  Put 2 tablespoons of Chef Shamy Gourmet Garlic Butter on top. Bake at 350 degrees for 20-30 minutes (depending on how cooked you like your squash).
Enjoy!

Please take a moment to vote for us on Picket Fence! It only takes one click!  Thanks!

Thursday, April 26, 2012

A Very Special Birthday


Our Mom's birthday is today!  And our Dad's birthday was last Sunday!  We are so thankful for the example that they have been to us.  

They have taught us so many skills such as music, hard work, welding, changing the oil, driving a standard transmission, changing the tires, gardening, performing in front of people (we had a family band), canning, cooking (Mom could make a wonderful dish by just throwing things together), baking, riding horses, working at the ranch, shoveling manure, blacksmithing, dutch oven cooking, milking the cow and the list goes on and on...


We had such a fun childhood and it was because of the experiences our parents provided for us.  When someone had an activity, the whole family helped.  We worked hard and played hard.  Life was fun!

One fun memory we share is the time our Dad ran into the house and said he found gummi worms hiding outside under the dirt clods.  We recently had part of our field tilled up and he went out one morning and hid gummi worms under the big dirt clods.  We thought it was amazing that gummi worms were coming out of the ground!  Now that we are older, Brittany has tried to recreate this experience for her kids, but she said that it needs to be a cooler morning and not in the middle of a hot day...the gummi worms melted.  :)

So I talked to my Mom this morning and asked what she wanted to do on her birthday today.  Most Mom's might go and get a pedicure or go shopping or even relax, not our Mom.  She wants to try our her new weed eater and remove the nails out of the boards from the chicken coop they tore down.  Only our Mom...we love her!

We are thankful and blessed to have them as our parents! And love them to pieces!

What have your parents taught you?


Please take a moment to vote for us on Picket Fence! It only takes one click!  Thanks!

Wednesday, April 25, 2012

Cropped Jean Jacket Refashion

I have been wanting to buy a Cropped Jean Jacket for a while now.  The problem is I just cannot justify spending that kind of money on a jacket.  I decided to make my own.  So, I stopped at Goodwill and picked up a Jean Jacket to make my own cropped jacket.
Here is the cropped jacket after I finished it....


This was seriously SO easy!  A whole lot easier than I thought it would be!  
Here is the jacket I picked up...  I got it for $8.00

This is the jacket that I wanted- Jessica Simpson's Cropped Jean Jacket at Dillard's for $54.00

  I started to take it apart.  I took off the very bottom hem of the jacket with a seam ripper.

When the hem was completely off, I cut the jacket to the length that I wanted.  As you can see in the first picture, there is a button on the hem.  I wanted the buttons to line up, so I cut the jacket at the 4th button (if that makes sense.)


Then I pinned the hem back on the jacket and stitched it back to the jacket.
Here is the finished product...
Only $8.00 


I absolutely LOVE how the jacket turned out!  I actually like it better than the jacket that I wanted to buy!
Here is a picture me wearing the jacket.  I wish I would have know how easy it was, I would have made one a LONG time ago!


Please take a moment to vote for us on Picket Fence! It only takes one click!  Thanks!

Tuesday, April 24, 2012

Spring Wreath

Here is the new wreath that I put on my door yesterday.  I'm loving it! 
It's perfect for Spring.  I love the colors and the simplicity of it!  It just makes me cheerful every time I open my front door!

I actually bought the base for the wreath at a yard sale a few weeks ago for 50 cents!  I knew that if I didn't buy it, then I would regret it in the near future.  And I'm so glad I did!


I bought a few flowers at Hobby Lobby when they were fifty percent off.  I wanted to stay with the whites, yellows and pinks.


I won an Easter wreath from Debbie over at Debbie Does Creations a few months ago.  She made a beautiful wreath that hung on my door throughout the Easter season.  She glittered an R for the wreath.  I loved it so much, that I decided to take it off and put it on this wreath too!


I'm absolutely loving it!


Please take a moment to vote for us on Picket Fence! It only takes one click!  Thanks!

Monday, April 23, 2012

Baked Garlic Butter Halibut

I was at Sam's Club the other day and they were test tasting Chef Shamy Gourmet Butters.  I decided to buy some and give it a try.  It was SO easy and SO good.


Baked Garlic Butter Halibut

In this recipe I used the Chef Shamy Gourmet Parmesan Basil Garlic Butter.
I first cut up a red onion and put it on the bottom of a greased casserole dish.  I put a tablespoon of the Galic Butter on the onions.  Then put a skinned Halibut on top of the onions with another Tablespoon of the Garlic Butter on top.
  Bake at 350 degrees for 20 minutes.

Enjoy!


Please take a moment to vote for us on Picket Fence! It only takes one click!  Thanks!

Thursday, April 19, 2012

Step Stool Chair Makeover #3

If any of you have been following our blog, you know that I absolutely ADORE the old Cosco Step Stool Chairs.  Well, I finally finished my last Step Stool Chair for my daughter!  Here is the finished product.

 Here is a picture before...  I paid a $15 for this chair at a yard sale- I thought it was a little high, but it is in perfect shape!

These chairs are SUPER easy to do!  I just taped up the stainless and spray painted the steps red.  I used Rustoleum Spray Paint (it taked forever to dry, but it is WAY worth the wait).  Then, I recovered the seat by using hot glue, vinyl tooled leather and trim.

Now my Step Stools match each other!
You can check out my other Step Stool Chair Makeovers by clicking HERE and HERE!


Please take a moment to vote for us on Picket Fence! It only takes one click!  Thanks!

Wednesday, April 18, 2012

Peanut Butter Fudge


This is our "go to" fudge recipe.  I originally got the recipe from my Grandma, otherwise known as Ma to all my cousins and friends.  I added milk chocolate chips to the recipe to add the chocolatey goodness that we all love!  My son (9 years old) was the one who actually made this batch of fudge with no help from me and it tasted great!


Chocolate Peanut Butter Fudge

1 can of sweetened condensed milk
1 cup of chocolate chips
1 cup of butterscotch chips
1/2 cup peanut butter
16 large Marshmallows, quartered
1 tsp of vanilla
dash of salt

Melt chips, milk, peanut butter and marshmallows in microwave.  Stir every 30 seconds until all ingredients are melted.  Add vanilla and salt. Stir.  Pour into a 9x13 inch pan.  Chill and cut.  

For thicker fudge, use a 8x8 or 9x9 inch pan.  I like my fudge thicker.   You can also play around with various types of chocolate chips.  The recipe originally called for 2 cups of butterscotch chips.  Sometimes I use all milk chocolate chips.  I think white chocolate chips would be tasty as well.


Please take a moment to vote for us on Picket Fence! It only takes one click!  Thanks!

Tuesday, April 17, 2012

Square Foot Garden- The SOIL

A few weeks ago, I posted the garden plot that my husband made for me. You can find that post HERE!  If you want more information on Square Foot Gardens- check out there website HERE!  We wanted our garden bed a little taller, so we added about 6 inches of sand at the bottom of the box.  The actual soil you use is an equal parts mixture of compost, peat moss, and coarse vermiculite.  We ordered this from a local greenhouse.
Here is what our garden looks like now with the soil.
My husband is the Irrigation Specialist for the Texas AgriLife Extension Service and here is a little video of him talking about Rainwater Harvesting and Gardening.  He explains things a whole lot better than I could ever do!  Take a moment to watch it!

Please take a moment to vote for us on Picket Fence! It only takes one click!  Thanks!

Monday, April 16, 2012

Easy Fix: Jeans into Shorts

Do you have old jeans that look like this?  Maybe the jeans aren't so old, but kids have a tendency to wear out jeans in the knees!  I can't even tell you how many jeans we have in our house right now that look like this.  As the end of the school year approaches, I'm constantly telling my boys to change into something that doesn't have holes!

I'm hoping I'm not the only mom this happens to!


So this morning, I took a couple of jeans from my boys and made them into shorts.  A cheap and easy fix...


I cut the jeans right above the holes that were in the knees.  I hemmed the edges and then folded the edge over and sewed it.  I used jean thread.  And I used the setting on my sewing machine that is a double straight stitch for the finishing hem.  It uses one needle and goes over the straight stitch twice, so you have the look of a thicker stitch.


So, we went from this...

to this and it didn't cost me a single dime!  Not bad for a new wardrobe!

What do you do with your old jeans?

Please take a moment to vote for us on Picket Fence! It only takes one click!  Thanks!

Thursday, April 12, 2012

Pretty in Pink

We have been absent the past few days.  Life has been extremely busy.  My family is really good at sharing, especially when it comes to sharing sicknesses.  Off and on for the past few days, we have had someone sick in our home.  No fun!  Hopefully this will pass sooner than later...And I have had so many assignments due this past week for my college class.  But I only have one more week and I'm done with this semester!  Yea!

I hope everyone had a wonderful Easter!  My daughter turned three years old on Easter!  She wanted everything to be pink: pink toys, pink cake, pink frosting, pink ice cream, pink candles, and even a pink snake that doesn't work!  (I still don't know where that one came from!)

So here's to pink...nothing fancy, just all PINK!


Please take a moment to vote for us on Picket Fence! It only takes one click!  Thanks!

Friday, April 6, 2012

Happy Easter

I hope that everyone has a wonderful Easter

This coming weekend, let us not forget the true meaning of Easter.  Here is a video that is worth watching and then you can ponder what the Savior means to you personally.  This video is done beautifully and I know you will enjoy it.


Happy Easter!

Thursday, April 5, 2012

My Easter Basket

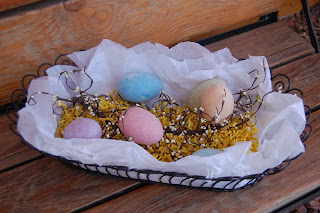
I wanted a cute, simple and easy centerpiece for my table in my living room.  I already had this basket that I keep on the table, but it needed to be changed from Valentines Day to Easter.


So I picked up some sparkle eggs from Hobby Lobby.  They are just a tad bigger than the traditional Easter eggs.  I already had some Easter crinkle grass and the white blossom branch.  I had to add some tissue paper to the basket or else the crinkle grass would fall out. 


And there you go...a simple and easy way to dress  up any room...my own Easter basket.


Don't forget to vote for us on Picket Fence!

Tuesday, April 3, 2012

Easter Wreath Tutorial

Here is an easy Wreath Tutorial for $10.
Wicker Wreath-$5
4 Bundles of Flowers-$4
1 Ribbon Spool- $1

This is what you need; wreath, flowers, ribbon, pliers, and glue gun (not pictured, whoops.)

Take the pliers and cut all of the flowers off the stems at the bottom of the bundle. You need the stem long so that you can glue them deep in the wreath.

Now, start with one matching bundle. Here I did the white berries and placed them kinda symmetrical to each other. Place a generous amount of hot glue on the bottom of the stem, then weave it deep in the wreath.

Here is another bundle. These were cute Easter Eggs with little flowers.

Do the next bundle. These were the pink tulips.

Now yellow Tulips...
Then the last bundle.
You can add more or less flowers. There really is no limit on how many you can squeeze in.

Now for the ribbon.
I found the center of my ribbon by folding it in half. Then I made a simple loop knot for hanging it on the wall.

Take the loop knot and place it where you want the top of the wreath to be.

Now take the ends of the ribbon and tie a secure square knot.

Now, to make a bow...take the ribbon and fold each end back and forth, which actually made 3 loops on each side. Hold it there.
Next, take the ends of the ribbon and go Under the bow, each in a different direction. Then meet back at the top and tie it again in a square knot.
You will need to fluff the bow up and shape it the way you like. It was easy with this bow cause it had wire in it. Now you are done.

Now you can take a deep breath and enjoy Spring!

Remember to vote for us on Picket Fence!
Related Posts Plugin for WordPress, Blogger...