Tuesday, July 31, 2012

Zucchini Bread

 
Zucchini is growing like crazy in my garden lately, so I have been trying to find recipes to use it up.  You have to have Zucchini Bread!  What do you do with your zucchini?
Zucchini Bread

Ingredients:
3 cups Flour
1 tsp Salt
1 tsp Baking Soda
1 tsp Baking Powder
3 tsp Ground Cinnamon
3 Eggs
1 cup Vegetable Oil
2 1/4 cups White Sugar
3 tsp Vanilla
2 cups Grated Zucchini 
Directions:
 1. Preheat oven to 325 degrees.
2. Mix flour, salt, baking soda and cinnamon together in a bowl.
3. Beat together eggs, oil, vanilla and sugar.  Add dry ingredients and mix.
4. Add zucchini until combined.  
5. Pour batter into greased pans and bake for 60 minutes.

Brooke

Monday, July 30, 2012

Crayon Roll

My kids still have one more month of summer left before school starts.  I wouldn't say that I'm the best at keeping my kids busy, they have a tendency to keep each other busy.  Which is really good for me!  

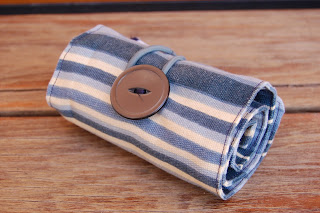
One of my sons really wanted to sew something, he has been asking for about a week.  So when he asked to make a crayon roll, I thought that it would be a simple enough project to start and finish in one day.


He picked out some fabric that we already had.  The fabric he used is a heavier type fabric, which really holds up for this project. 


He already had in his mind how he wanted it to look like.  I just had to guide him on a few parts, but I was really impressed!

I think he did a pretty good job!  He has taken it many times in the car and this would be great to take to church as well.

Now he wants to make them and sell them.  We shall see...


Briana

Thursday, July 26, 2012

Stromboli


Here is a recipe that is so yummy, and it uses our versatile Pizza Dough Recipe.


 You are going to prepare the pizza dough as directed HERE. Make sure you roll it out flat and even on a greased pan. I used my favorite stone ware pan from Pampered Chef.

Then you are going to smother the dough with Marinara Sauce, Cheese, Pepperonis, and any other pizza toppings you like. The possibilities are endless. 

Once you top it you need to roll it up the best you can and as tight as you can with out ripping the dough. 

Then you get an egg white and whip it fluffy and smother the dough on the top. This will get a nice crispy and shiny top.

Optional: Sprinkle Garlic Salt, Italian Seasoning, Parmesan Cheese, or Mozzarella Cheese right on the top too. 

Bake at 475* for 10-15 min. It bakes hot and fast. 
You will have a roll like the picture below. Let cool slightly before you cut it up and enjoy!


Have you used our Pizza Dough recipe? Let us know what you have created!
Here is some things that we have done with it.
 
Pizza
Monkey Bread

Bridget

Wednesday, July 25, 2012

Giveaway {Shabby Apple}


 We have another fabulous giveaway for all of our readers!  How does $50 to Shabby Apple sound?  I know I would love to win!

Here are a few of our favorite items from Shabby Apple:

Navy pleated skirt dress has a belt with bow, v-neck, and cap sleeves
Bon Voyage
Made from a ‘love-me’ red cotton with a dainty, white-flower print, this frock will make you anyone’s heartthrob.  The frock has a faux-wrap, wide sash, two pockets on the chest and a collar.  The skirt has numerous inset pleats that allow for dancing and twirling to one’s heart’s content.  The dress is lined through the hips.
Heart of Me
And with Brittany and Brooke expecting babies in the next few months, we had to take a look at some maternity clothes.

Shirt collar dress with bow tie below bust line.  Skirt hits above the knee.
Oh Baby
Purple maternity dress with long tie at waist and flared sleeves
Aphrodite
And the kids section is too cute!

Little girl’s black party dress with three bubble tiers, a thick white sash, and round neck
Starry Night
Patterned tuxedo little girl’s dress with ruffles on bodice  and three quarter length sleeves.
Canary
We are going to be using Rafflecopter for the giveaway.  It starts today (July 25) and will end next Tuesday (July 31).  The winner will be announced the following day.

The giveaway is only open to US addresses, for shipping purposes.  Sorry to all our international readers.

a Rafflecopter giveaway

And Shabby Apple is offering all of our readers 10% your entire purchase.  Just use the code   babblingsandmore10off
This code is good for the next month.
Thank you and Good Luck!


Briana

Tuesday, July 24, 2012

Horseshoe Necklace Holder


I have been getting overstocked with necklaces, my personal ones and the ones I make. So I decided to go and create something out of my parent's scrap treasures! So I found this really antique mahogany board that my dad has had for about 12+ years! I cut it over 2 feet long and with horse shoe nails, nailed 3 used horseshoes to it. It costed me $0 cause I have such cool parents! 


 That is really antiqued paint, not new stuff here. :o)

Here is the rake head that I found and posted a few weeks ago. It now holds all the necklaces that I sell in my shop.

 Oh yes, and ALL of these are for sale in my shop called Western Hospitality. In fact I decided to share a coupon code with all of our Babblings And More Followers. Enter ILOVEBLING for 20% off in our Western Hospitality shop.


Bridget

Monday, July 23, 2012

A New Look

Last week we had a total blog makeover! Kim from Seven Thirty Three Design did a fantastic job making our blog look amazing!


seven thirty three - - - custom blog design

She fixed up our blog, facebook page and etsy page.  You can go and check them all out on our sidebar.  And she made a cute new button for us...
 So go ahead and pick one up!


So if you are interested in having any blog work done, we highly recommend her!  Thanks Kim! 

Briana


Wednesday, July 18, 2012

Circus Breakfast

I was feeling a little experimental this morning and wanted to make breakfast fun. I have a waffle maker that I got from Amazon that makes theses cute little circus animals of a giraffe, elephant, and monkey. My boys love them! So I added sprinkles to the waffle mix and whipped up some Watermelon Syrup. It was delicious! I always make homemade maple syrup so watermelon was a fun twist. I put it in little glass bowls that I got at the dollar store cause the boys love dipping the animals in it. 
Watermelon Syrup
1 Cup Water
1 Cup Sugar
1 Cup Light Corn Syrup
1/2 tsp Watermelon Candy Oil

Put all the ingredients in a large pot, except the watermelon oil. Turn the stove on high and watch it get hot. The mixture will be cloudy when it is at a slow boil. Once it turns clear (it will be at in instant) it is done! Then add the Watermelon (or any other flavor) Oil to the syrup. 
Enjoy!


Here is the Waffle Maker that I used.


This is my favorite Waffle Mix!


Here is the Watermelon Flavoring. I also sell it in my Etsy shop HERE!

Wednesday, July 11, 2012

Pretty in Pink Quilt

Last week I showed you the top to this quilt.
Well, I worked really hard and finished the entire quilt and I love it!  


For those of you who didn't see last week, I made this quilt from all of my daughter's receiving blankets.  I also added some pink minky fabric because I didn't have enough receiving blankets for the size of quilt that I wanted to make.  

This is a great repurpose project! 
 

This quilt is so incredibly soft, you would not believe!  I'm thinking that I want to sleep with this blanket every night!


I used a walking foot on my sewing machine to quilt it.  I followed the zig zag pattern, but I did not "stitch in the ditch".  I stitched in the center of the zig zags or just above or below the seams.


The binding took awhile.  I did the usual method of stitching one side to the quilt with the sewing machine and then hand stitching the other end to the other side of the quilt. 


A few years ago, I made a quilt out of my boys' receiving blankets.  That quilt is another family favorite, as I'm sure this one will be!  

This is a great way to take something precious and make it into an heirloom!

Tuesday, July 10, 2012

Red, White, and Blue Desserts

For Independence's Day this past week I got on Pintrest and found some yummy treats to make and share for our family get together. I wanted to make something completely different than cookies and cake, so I found these pretty yummy recipes. Check them out! 

Red White and Blue Meringues

Ingredients
3 large egg whites, room temperature
3/4 cup white sugar
1 teaspoon vanilla extract
Pinch kosher salt
Pinch cream of tartar
Red gel food coloring (such as Wilton)
Blue gel food coloring
Ziplock Bags
Instructions
  1. Preheat oven to 200 degrees F.  Line 2 large baking sheets with parchment paper and set aside.
  2. In the metal bowl of a stand mixer (or a regular metal bowl) add the egg whites, sugar and vanilla.  Place over a medium saucepan of simmering water.  Stir until the sugar melts and the mixture is almost clear.  
  3. Place the bowl into the stand mixer and using the whisk attachment, whip for 7 minutes on medium-high.  The meringue should be glossy and stiff.  
  4. Using a small paint brush, brush a line of red food coloring from the piping tip up the inside of the bag. Repeat with the blue on the opposite side of the bag.  Fill with the meringue and pipe into swirls or whatever shape you desire.  Place in the oven and bake for 1 1/2 hours.  Remove and cool completely on a wire rack.  Eat them.  Eat them fast before anyone else finds them.  


Check out my Pin here for the original recipe! Keep out of Humidity!!


Red White and Blue Creamy Coconut 
1 15 oz can Cream of Coconut (I found it in the liquor isle by Grenadine of Pina Colada Mixes)
10.5 oz White Chocolate, finely chopped or Chips
10 oz Unsweetened Coconut (do not use Sweetened)
Red and Blue Food Coloring

Double Broiler

In a double broiler melt the Chocolate Chips an Cream of Coconut together. Add the Coconut. Stir Well. Divide the mixture in three bowls. Add Red Food coloring in one bowl, and Blue to the second bowl, and leave the third bowl white. Grease a 8 x 11 pan (or close to the size) and press the red coconut mixture evenly into the pan. Then layer the white mixture on the red, then blue on the top.
Let cool in the fridge for a few hours then cut into small squares.

To see the original recipe with better details check out Hungry Happenings Here!


Red, White and Blue Crispy Balls

3 TBS Butter
10 oz package of Marshmallows
5 cups Crispy Rice Cereal
1 cup Strawberry flavored Apple Flakes
Blue Food coloring
1/4 tsp Blueberry Lorann Candy Oil 

MICROWAVE DIRECTIONS:
In microwave-safe bowl heat butter and marshmallows on HIGH for 3 minutes, stirring after 2 minutes. Stir until smooth. Microwave cooking times may vary. Add the candy oil and food coloring to the marshmallow mixture. In an large bowl, stir in the Apple Flakes and Crispy Rice Cereal. Mix well. Let cool slightly. Spray your hands with cooking spray like Pam, and grab a small portion of the mixture and roll into balls. The Pam helps so that the mixture doesn't stick to your hands. 


Note: I used the original recipe for Rice Crispy Treats found HERE and substituted 1 cup of the Rice Crispy's for the 1 cup of the Apple Flakes. I got the Strawberry Flavored Apple Flakes at Walmart a while ago in their bulk food storage area. Now they do not carry the brand that I used so I am not sure where you will be able to find the apple flakes now. So 1 cup of Fruity Pebbles would work just as good!


Check out my Red, White and Blue Board on Pinterest here. It has some more lovely recipes and decorating ideas too! 

Monday, July 9, 2012

Homemade Apple Juice

My mom has an apple tree that produces TONS of apples.  She recently gave me a box full of apples so I decided to make some apple juice. 
Apple juice is SUPER easy to make and the perfect thing to do if you have tons of apples that are not 100% perfect.
You first need to wash your apples.  I just put them all in the sink and washed them all at once.
I then run them all through our juicer.  If you don't have a juicer there are several other methods of making apple juice, but I really recommend just buying one.  It is definitely worth the money!
Here is a link to one. There are several other one on amazon though.
 Juicing the apples is my children's favorite part!  They love putting the apples through the juicer!
Once you juice all the apples I put the juice in a pot and bring it to a boil.  While it is boiling I just scraping the sediment from the top of the juice.
Once I get most of the sediment off, I run the juice through a strainer.  I just use a handkerchief laid in my strainer and it works great!
Then you put it in your jars.
 I did not water bath my juice here because I did not have enough to make it worth my while.  But I have done it before.  Here is the recommended process...
  • Boiling-water bath
  • Pints or Quarts – 10 minutes
  • Half-gallons – 15 minutes

Friday, July 6, 2012

Feature Friday: Rivers Recipe Review

I recently came across a blog that I fell in love with!  Who doesn't love looking at beautiful pictures of wonderful food?  At Rivers Recipe Review, you will spend your day looking at all the yummy food and wanting to whip up the delicious recipes yourself!

Alyssa Rivers is the creative force behind Rivers Recipe Review.  She takes recipes and reviews them.  Then she rates them on level of difficulty and how good it was.  She also includes changes she would make and if she would make it again. She is a SAHM of two cute boys and you should really click on over to her blog and check it out.

I had a hard time picking which pictures to post here because they all look so yummy!  But here are a few...

The Key West Grilled Chicken looks amazing!


And you will definitely have to check out The Best Sweet Pork Tacos!


My husband will absolutely love these Mini Peach Cobblers!  Peaches are his favorite! And I love how they are in individual servings.


And this Zesty BBQ Chicken is something that I will definitely have to try as well!


So take a few minutes and stop by Rivers Recipe Reviews and I know you will not be disappointed!

Thursday, July 5, 2012

Summer Snack- Chocolate Covered Bananas

I am always looking for kid-friendly recipes that my children can help me make.  This one was a lot of fun for my kids and they loved them!
Chocolate Covered Bananas!
I got this recipe out of the July 2012 Friend  Magazine.  It was super easy.  You can find the recipe HERE.
Instead of using chocolate chips, I used the Wilton Chocolate Melts. You can find these melts at JoAnn's, Hobby Lobby or Amazon (see link below).  I also didn't have any popsicle sticks, so I just used plastic knifes.  I just cut the knife part off, so it was just the handle.


Wednesday, July 4, 2012

Sweet Servings Giveaway Winner

Thank you to everyone who entered our Sweet Servings Giveaway!  We had 254 entries!
Rafflecopter picked our winner...#234

Debra Lee

Congratulations!

I will email you, if I don't hear a response within 48 hours, a new winner will be chosen.

Thanks to all who entered!

 
And for those of you who didn't win and really want some yummy pretzels, you can contact Cindy from Sweet Servings  and she will be happy to accommodate any order!

Tuesday, July 3, 2012

Pretty in Pink Quilt Top


If you have been following us for awhile, you might remember the Quilt that I made out of Receiving Blankets from my boys when they were babies.

Well, after I had a handful of boys, I had two sweet, little girls.  So we made a huge shift to everything Pink!  It was a lot of fun!  But now I have girl receiving blankets that are taking up room in the closet.   I figured it is time to make another quilt!


I decided to go with a zig zag pattern this time and it was so much fun!  I didn't have enough blankets to cut up to make a twin size quilt, so I found some light pink minky fabric that I bought a long time ago with stars embedded in it and I used that fabric and alternated it between the receiving blankets.  

This quilt will be so soft!  I'm excited to finish it!  I just bought a walking foot for my sewing machine and I am in the process of machine quilting it.  I just wanted to give you a little preview!  I love it!


Related Posts Plugin for WordPress, Blogger...