Thursday, September 27, 2012

Hello Fab Giveaway Winner

It is time to announce our Hello Fab Winner!

 We had 526 entries and the giveaway winner is #387... 

 Congratulations Elizabeth!

 I will email you, if I don't hear a response within 48 hours, a new winner will be chosen. Thanks to all who entered! And for those of you who didn't win and would love to buy something...take a minute to stop by and visit Hello Fab! 

Briana

Wednesday, September 26, 2012

Hello Fab GIVEAWAY!!!

Just a reminder...
Our HELLO FAB giveaway ends in three hours!  Don't forget to enter it!!!


Brooke

HELLO FAB {one day GIVEAWAY}!!!

We have a SUPER exciting giveaway today!  It is also only a ONE DAY giveaway so be sure to enter TODAY!
 
The giveaway we have for you today is from an cute store called Hello Fab!  Our friend Jenna is the owner of this ADORABLE shop and she is the momma of one cute child!  Hello Fab is an online boutique that sells the cutest statement necklaces, earrings and bracelets.  The prices are SUPER affordable, so you get an expensive look that is great on your pocket book!
The winner of this giveaway will receive any item of their choice!! 
Lets take a look at some of her pieces. 
 

This necklace would definitely add a touch of color to any outfit! 

Who doesn't like diamonds?  This necklace would go with anything and it is affordable!
 
This necklace was inspired by J. Crew.  Get an expensive look for a whole lot less!
 
 
 Now on to the giveaway!!
 
This giveaway starts TODAY and we will announce the winner TOMORROW!!!
 
a Rafflecopter giveaway  
Brooke

Tuesday, September 25, 2012

Homemade Oreo Cookies

My son and I share a birthday, along with Bridget's son. It is definitely a busy day!  

I picked up some Sonic meals and ate lunch with him in the cafeteria.  Then me and my two girls (ages 3 and 1) rushed to Wal-mart to pick up some M&M's to make some cookies to take to his class at the end of the day.  (The schools here are very picky about birthday treats.  You are not allowed to bring anything with frosting.  However, they allowed homemade M&M cookies.) They were a big hit!  I should have made more because the kids kept asking for seconds.  :)

  I asked my son what kind of cake he wanted for his birthday celebration with the family.  He didn't want a cake, but homemade Oreo cookies with Oreo ice cream.  So that's what he got!  And they were so good!  My sister-in-law gave me this recipe years ago and they are yummy and easy!


Homemade Oreo Cookies

1 Devils  Cake Mix
1 Cup Shortening
2 Eggs

Beat together until well mixed.  make into small balls and put on cookie sheet.  Bake at 350 degrees for 8 to 10 minutes. Do not over bake.

Filling:
1 - 8 ounce package of Cream Cheese
1/2 cup Shortening
Powdered Sugar
1 tsp Vanilla 

Mix together Cream Cheese and Shortening until smooth.  Add powdered sugar until you reach a spreading consistency.  Put in between 2 cooled cookies.  Enjoy!


Briana

Monday, September 24, 2012

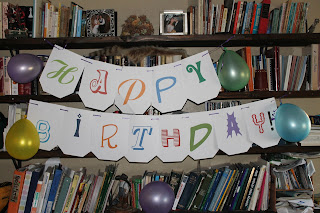
Happy Birthday Banner

We had the pleasure to celebrate 3 birthdays in our family on Wednesday, Sept 19th!
Briana, Devin (Briana's Son), and Tillison (Bridget's Son)


I had 5 minutes to make Tillison a banner before he got home. Totally a last minute idea, but it turned out great!
 In my Word program I typed "Happy Birthday". Then enlarged it to 500 font size. Then went through each letter and changed the font to something fun and a different color. I printed it out on card stock. Punched out 2 holes at the top and threaded curling ribbon through the holes. Then trimmed the bottom corners at a 45 degree angle to make it look like all the other cute banners I have seen. It was so easy and the boys all thought it was so cool when they got home from school. 

 Happy Birthday Tillison.
Bridget

Friday, September 21, 2012

Feature Friday- Reeds Blacksmith Shop!

Are you looking for the perfect custom gift?  
You need to check out our Dad's Etsy Shop called Reeds Blacksmith Shop.  He does AMAZING work and even does custom orders!
These make the perfect wedding gifts!
 A Heart Dinner Bell- wouldn't that look adorable in a country house!
 Here is a hand-forged heart made out of a used horseshoe.
I have one of these horseshoe key rings and I love it! 
Go check out Reeds Blacksmith Shop and get your orders in before the rush of the Christmas Season!

Thursday, September 20, 2012

Kids Art Storage Folder

As many Moms know, when you have children you seem to accumulate tons of their art projects.
 My fridge has been completely full of them!  
I wanted a storage solution, but I didn't want to put them away because they love to look at their art.  So, I decided to make them art folders that they can look at, add to and take with them to show off.
 I just bought some 1 inch folders and some sheet protectors.  
I had my kids paint the front of the folder with their hands and the back with their feet (they loved that).  Then I printed their names out put it in the side.
Then I just made sure to date each picture/project, and then put it in the sheet protector.
They adore their new folders and now where so excited to show Dad all of the artwork when he got home.  It is also nice that my fridge is clean!
Brooke

Wednesday, September 19, 2012

Western Hospitality Winner!!!

It is time to announce our Western Hospitality Giveaway Winner!  
 
We had 140 entries and the giveaway winner is #58...
 Dee Wolters
 
Congratulations!
 
 I will email you, if I don't hear a response within 48 hours, a new winner will be chosen. Thanks to all who entered! And for those of you who didn't win and would love to buy something...
 
Visit Western Hospitality on etsy!

Brooke

Tuesday, September 18, 2012

Giveaway Reminder!

This is just a reminder to enter our Western Hospitality Giveaway!   Get your entries in because it ends tonight!!!  Good Luck!

Brooke

Friday, September 14, 2012

Friday Feature: Sew Stormy


My friend has the most amazing quilting room!  She has fabric in her room that could last me a lifetime and I would be so happy!

She started a Star Sampler Quilt on her blog a while ago and for all of you quilters out there, it would be so fun to follow along.  She shows how to make each star block step by step and each one is different.

He blog is called Sew Stormy and we have featured it before, but this was just too fun to pass up!

Here is a little sample of a few of her blocks...

Here is Block 6:
Star Sampler Quilt A Long

Here is Block 5:
 Ribbon Star

Here is Block 4: (and I love these colors!)
Star Sampler Quilt Along

 So, hop on over and start your own Star Sampler Quilt!

Briana

Thursday, September 13, 2012

Homemade Baby Food

  I have had a overload of squash from our garden.  There is NO way I could possibly eat it all of it.  So I decided to make some baby food and freeze it for later.
I first cut all of the squash in half and baked it until it was soft.  I bake it at 350 degrees for about one hour.
I let it cool down then I scraped out the squash on the inside and put it in a bowl.  Then I blended it all up with a hand blender.
 Then you just fill up whatever containers you would like to use and stick them in the freezer.
I got the little containers at Walmart.  They were about 6 for $1.
  That's it!
Brooke

Wednesday, September 12, 2012

Western Hospitality {GIVEAWAY}!

We are having another exciting giveaway to announce!  
Bridget is SO talented and has a shop called Western Hospitality! She makes all sorts of unique items like custom chunky necklaces, bling flip flops, holsters, sucker molds and one of a kind Halloween decorations.  You seriously need to check out her shop to see what she has!
Today she has offered to giveaway a single Chunky Bling Necklace of YOUR choice! 
Here are some of her necklaces.
 Here is a two strand green turquoise necklace!  The best part of this necklace is that her husband hand-forged the horseshoe!!!
 Here is a gorgeous steer head chunky pink turquoise Necklace!
She also makes adorable matching Mother/Daughter necklaces!
Here is a picture of my daughter and I wearing our matching necklaces!  My little girl loves her necklace SO much especially because it matches Mom!
Now, on to the Giveaway!
This giveaway will end Tuesday night and the winner will be announce next Wednesday!
 
This giveaway is only open to United States residents!
 

Tuesday, September 11, 2012

Homemade Baby Wipes

As many of you know, I just had a baby a little over 2 weeks ago.  The thing that I am doing different with this baby is CLOTH DIAPERS!  I was a little hesitant about it, but to my surprise...  I LOVE IT!  They are super easy and I do not have nearly the amount of accidents that I did with disposables.  I figured that if I am washing diapers, I might as well wash some wipes to.  So I decided to make my own wipes because it is SO much cheaper.
These are SO easy to make.  I had some left over flannel, so I cut them up in 8in x 8in.  Then you just to a hem stitch around the edges so they don't fray.  The 8x8 fits perfectly in the wipes container.  
If you are looking for wipe solution, there are many homemade recipes you can use. Click HERE to see a bunch of recipes.
Now, I just need to convince the rest of my sisters to change over to cloth diapers!

Brooke

Monday, September 10, 2012

Peaches and Cream French Toast

I came across this recipe in an advertisement ad for canned fruit in the All You magazine.  It just looked so good that I had to try it and I am so glad I did!  I modified it just a bit. The recipe is so yummy!  And my kids loved it!


Peaches and Cream French Toast

Ingredients:
1 - 8oz loaf French Bread
8 eggs
2 cups whole milk
1/4 cup sugar
1 tsp vanilla extract
2 - 15oz cans of sliced peaches, drained
1/2 cup packed brown sugar
1/2 tsp cinnamon
Whipped cream (opt)

Prepare a 9x13 inch baking dish by spraying it with cooking spray. Arrange sliced bread along the bottom of the pan.

In large bowl, mix together eggs, milk, sugar and vanilla until well blended.  Pour over bread.  Arrange peaches on top and sprinkle with brown sugar and cinnamon.  Cover tightly and and refrigerate for at least 8 hours.

Remove baking dish from refrigerator and let sit for 30 minutes before baking.  Preheat oven to 350 degrees.  Bake until lightly brown on top and cooked through, for about 45 to 55 minutes.  Let stand about 10 minutes before serving.  Top with whipped cream.

Briana


Friday, September 7, 2012

Sugar-Free Peanut Butter No Bake Cookies

 My husband is allergic to pretty much everything!  So I am always looking for new meals and dessert to make.  I recently tried these Peanut Butter Cookies and he absolutely LOVES them so I thought I would share them with you.
 
Sugar-Free Peanut Butter No Bake Cookies
 
Ingredients:
2 Cups Splenda
1 Stick Butter
1/2 Cup Milk
1 Cup Peanut Butter
1 tsp Vanilla
3 Cups Oats
Wax Paper
 
Directions:
In a saucepan, boil the splenda, butter and milk.  Boil for 1 minute then add the peanut butter, vanilla and oatmeal.  When all mixed together, drop the mixture on wax paper until they are cooled and hardened.  
 
ENJOY! 


Brooke
Related Posts Plugin for WordPress, Blogger...