Tuesday, April 30, 2013

Orange and Turquoise Pinwheel Quilt

A few months ago, I bought some Moda fabric on clearance.  I liked how it was bright, playful and fun and wanted to make a quilt!  So I decided that I needed to start and complete this quilt before I had my baby girl, who was due in February (a few months ago). 

Well, I finished it!  I know that it's April now, but I am just getting around to posting it, mainly because I needed someone to hold up the quilt for me so I could take a picture.  Having 13 year old twin boys really come in handy for a picture like this.  :)  I actually finished the quilt in February.


I wanted to use a different pattern than I had done before.  So I was on the look out for different patterns of quilts.  I actually don't use "patterns",  I don't know how.  :)  I just like to look around and when I find something I like, then I figure out a way to create it!

I was eyeing a quilt that my husband's grandma made and gave us for our wedding 14 years ago.  It had the pinwheels on it and I thought this fabric would be so fun to make pinwheels out of!  So here it is and I love it! 

I made the quilt by cutting blocks in half and the sewing them into diagonal squares and then the pinwheel pattern.  Then I added the strips and pieced the quilt together.  I used my walking foot to machine quilt it.  I followed the pinwheel pattern and it turned out cute!


My daughter quickly claimed the quilt.  The boys said that it was "too girly", so they were OK with it.  But over the past few months, I see the quilt being used by the boys more and more.  
I guess the comfort of a homemade quilt out weighs the "girly-ness" of it.  :)


Briana

Friday, April 26, 2013

Shabby Apple:Fete des Fleurs

I was so excited when I saw the new line from Shabby Apple called Fete des Fleurs.  This line is full of beautiful pastels, lace and lots of spring prints!  Perfect for this time of year!

Daisy dress

So beautiful and classy!  I'm in love!

So click on the Shabby Apple ad on our side bar and take a look!
I think you will be thinking that Spring is here to stay!

Peony dress
Briana

Wednesday, April 24, 2013

Giveaway: Fluffy, Funny, and Fabulous

 
 As many of you know, we are a group of four sisters.  We were excited when we were contacted by a group of five sisters to review a book they had just written.  We jumped on the idea and haven't looked back!  
 
I absolutely love the idea that this group of sisters had about writing down their history.  But as most of you know that have siblings, we all have different memories, even if it is about the same event.  In this book, all five sisters share their memories about growing up in a small town.  This book will make you laugh, cry and reminiscence about your own childhood and memories of family and friends.  It has really opened my eyes to the importance of writing down family history.  You will love reading this book!  

And now you have a chance of winning a copy!  But first let's hear from the sisters:

Fluffy, Funny, and Fabulous
 
"When the five of us get together, we always come back to our memories of growing up. Our ages span nearly twenty years, so our memories are oftentimes very different. This creates some interesting dialogue. 
One sister starts out a story, and the others soon chime in with their version. Whenever we are all together, we get comments from others saying they wish they were a sister.

The book Fluffy, Funny, and Fabulous: A Tale of Five sisters was written a a collaboration between all five sisters.  Each chapter starts out with me( Anita) telling about my memories, then Vicki gives her story, and on through all sisters.   While the book is intended to be humorous it also deals with serious events like the death of our Father and of our Nephew.

All five sisters live in the Midwest.  Anita in Aurora, IL,  Vicki, approx 20 miles away in St. Charles, IL, Linda in North Aurora,  Helen in East Moline, IL  approx. 125 miles from the us and Ruth in Lake of the Ozarks, MO.

We all talk several times during the week and get together at least 4 times a year."


To enter the giveaway, use the Rafflecopter form below. 
 And for more information about
 Fluffy, Funny, and Fabulous: A Tale of Five Sisters,
 take a minute to stop by their website:
a Rafflecopter giveaway
 

Briana

Tuesday, April 23, 2013

Help Needed... Chore Charts?

I need some help or advice....
I am looking into doing a Chore Chart/Allowance System for my children, but do not even know where to start.  My children are ages 4, 2 and 8 months.  
All you professional, organized mothers out there- what kind of chore charts do you use?  What sort of allowance do you give your kids?
 
I looked into a few chore chart and here are a few of my favorites.  
Have you tried any of these?

Briana made a Chore Chart a couple months ago with some magnets...
 
Would a Printable Chore Chart  be better?
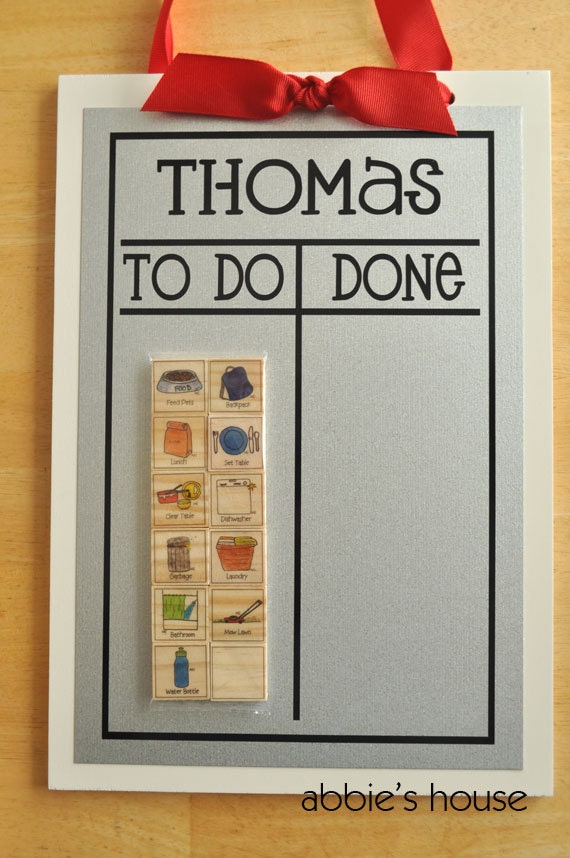
I could just order some Chore Charts from Abbies House on Etsy.  They are SUPER cute.
 
 
CHORE CHART COMBINATION - Set includes Chore Chart & Create Your Own Magnet Set of 12
 
 Please HELP!
Any advice would be greatly appreciated!
 

Brooke

Monday, April 22, 2013

Grilled Chicken Ranch Pasta

Do you every have those days when you know you have to make dinner, but have no idea what to make?  I actually have those days quite often.  Usually I end up throwing a bunch of ingredients together to make a meal.  I never write down what I made, but when my kids ask for it again, I really regret that I did not take the time to do it.  So here you go!


Grilled Chicken Ranch Pasta

Ingredients:
Grilled Chicken (your preference on how much chicken you want in the pasta)
One frozen bag of Peas
One box of uncooked pasta
One small can of Cream of Chicken Soup
2 cups of milk
One Packet of Ranch Dressing Mix
2 TBS Parmesan Cheese
Salt and Pepper

Put peas in pot of water.  Boil.  Once the water starts to boil, add pasta.  Cook until pasta is tender.  Drain Pasta and Peas.  Return pasta and peas to pot.  Add grilled chicken.  (I used frozen grilled chicken strips and warmed them up in a pan beforehand.)  Add can of soup, milk and ranch dressing mix, and parmesan cheese.  Stir and warm up.  Add salt and pepper to taste.  Enjoy! 

Briana

Friday, April 19, 2013

My Little Legs Giveaway Winner!!

We are excited to announce a winner to our My Little Legs Giveaway!!!
Drum Roll.... And the winner is...
 
#178- Tonia Jeffery
 
Congratulations Tonia!!! 
 
I have sent you an email.  You will need to respond to the email within 24 hours or we will pick a new winner!  Thank you to everyone who entered!
 
  If you didn't win, you can always click on over to My Little Legs and go shopping!  And we have some really exciting giveaways coming up, so stay tuned!!
 
Briana

Tuesday, April 16, 2013

Rosie's Blessing Dress

I did it! Or I should say that I made it!


Rosie's Blessing dress is finished!  It's nothing really fancy, but I love the simplicity of it and the vintage look that the fabric gives to it.  


I found the fabric on the clearance rack at Hobby Lobby and bought it to make a skirt, but I love the way it turned out for this dress!


I added roses to the waist and lace to the bottom which completed the look. 

The dress turned out lovely and I'm so glad I was able to sew it for my baby girl.


Briana

Monday, April 15, 2013

Chocolate Graham Cracker Peanut Butter Bars

I love Peanut Butter and Chocolate!
If you are LOVER of these ingredients you definitely need to try this one out!!


Chocolate Graham Cracker Peanut Butter Bars

Ingredients
10 Squares of Chocolate Graham Crackers, Crumbled
2 Cups Peanut Butter
3/4 Cup Butter (room temperature)
4 Cups of Powdered Sugar
1 tsp Vanilla
2 Cups Chocolate Chips

Directions
1. Cream together the Peanut Butter, Butter and Vanilla until soft and smooth.
2. Add the Powdered Sugar and blend well, then add the Graham Crackers and mix.
4. Spread in a 9x13 inch pan.
5. Melt the Chocolate Chips and spread over the top of the Peanut Butter mixture.
Refrigerate until firm, then cut into bars and serve. 


Thursday, April 11, 2013

My Little Legs Giveaway: Swaddle Blankets

 
We all love My Little Legs here at Babblings and More!  We love all the products they carry and the customer service is excellent!  They have hats, leg warmers, bows and they now carry swaddle blankets!
 
 
  I just had my eighth child and this is the first time that I have ever used a swaddle blanket and I am wondering why it took me so long to try them out?   My Little Legs sent me their Lovely Lilah Chevron & Flowers Muslin Swaddle Blankets  to review.  And I am absolutely in love!
 Swaddle blankets are made out of 100% cotton muslin.  I love how they are so lightweight and breathable.  When I nurse my little girl, I prefer to use the swaddle blanket as opposed to anything else.  And they really do get softer the more times you was them.  
 
 
 We have such a treat for you today!  My Little Legs is going to give one set of swaddle blankets of your choice to one of our readers!  That is a $35 dollar value!  So what are you waiting for? Hurry and enter!
 
a Rafflecopter giveaway
 
Briana

Wednesday, April 10, 2013

Tip Hero's Giveaway: $100 Walmart Gift Card

We have a another fun giveaway for you today!  We have partnered up with Tip Hero and other bloggers to bring you a $100 Walmart Gift Card!


Welcome to the "Spring Cleaning" giveaway event sponsored by Tip Hero, featuring some fabulous bloggers and the opportunity to win a prize that's sure to help you with your spring cleaning efforts!
We've featured many tips here at Tip Hero that can help you save money on spring cleaning. Our free homemade cleaners ebook, for example, features some great homemade cleaner recipes from us and from our extremely helpful readers. But if you're in need of some of the basics for cleaning up or redecorating, a $100 Walmart gift card is sure to come in handy!
This giveaway begins on April 10th and will run until April 24th at 11:59pm US Eastern time. It will be open to residents of the US only, 18+. Use the PromoSimple form below to enter, and be sure to take advantage of the many entries you can gain. You can also come back daily for more chances to win. Good luck!

$100 Walmart Gift Card 

Monday, April 8, 2013

Good Ol' White Bread

Very rarely do I buy bread from the store.  In fact, I can't even remember the last time that I did!  I make my own bread.  And we love it!

A few years ago, while my husband was in Medical School, he would make the bread.  He really enjoyed making it and he would always give one of the loaves away to friends, family or neighbors.  He would say, "I may not be the bread winner, but I am the bread maker."  :)


Anyway, I wanted to share with you my go to bread recipe.  This is just a basic recipe and vary it from time to time, but I will share those variations later.

When I make bread, I use my Bosch mixer.  We lucked out big time and found one at a yard sale for $10!!  That is a smokin' deal and it gets used all the time. The benefit of using a Bosch is that once the dough is mixed, you just mix it for 6 more minutes and that takes over one rising. That just means that your bread will be done twice as fast!


White Bread

Ingredients:
3 TBS Yeast
1/2 Cup Sugar 
1 1/2 TBS Salt
8 Cups Flour
3 Cups Warm Water
1/2 Cup Oil (I use Canola Oil)

Mix yeast, sugar, salt and 4 cups of flour. Add water and oil to mixture.  Add rest of flour one cup at a time until dough pulls away from the side of the bowl.  Continue to mix for 6 minutes.  Divide dough into thirds.  Put in three bread loaf pans, cover and let rise for about one hour.  Bake at 350 degrees for 25 minutes.  Butter tops of bread when done.  Let sit in the pan for a few minutes and then transfer to a cooling rack.  Enjoy!

This recipe is also great for pizza dough, rolls and cinnamon rolls!

Briana

Thursday, April 4, 2013

Blessing Dresses

With my last two daughters, I made blessing dresses for them.  I really enjoyed making them, especially since I had five boys first!  It is so much fun to sew for girls and I liked coming up with different designs. 


For my first daughter, I made a simple, yet dainty dress.  I added a layer of lace over the bodice to add texture.   I also added little flowers to the front and the sleeves.  When I tried the dress on her, the sleeves seemed way too big for her little arms, so I gathered them by hand.  I love the way the dress flowed at the bottom!


For my second daughter,  I wanted to try a different look.  I changed the sleeves altogether and they fit so much better.  I keep the bodice plain, but added a layer of lace at the bottom of it.  The skirt part is what sets this dress apart from the other.  I made roses out of the fabric and gathered the bottom of the skirt in various places and then attached the roses.  I think that it gave it a princess feel to the dress.


Now, since we are going to bless my third daughter sometime next month, I am dreaming and designing another dress.  I'm thinking of going for more of a vintage look.  I will definitely post pictures.  I am really excited to see the finished product...but I have to get started on it first.  :)

Briana

Wednesday, April 3, 2013

Shabby Apple Giveaway Winner

We are excited to announce a winner to our Shabby Apple Giveaway
Drum Roll.... And the winner is...
 
#1326- Grace Bowles Inman
 
Congratulations Grace!!! 
 
I have sent you an email.  You will need to respond to the email within 24 hours or we will pick a new winner!  Thank you to everyone who entered!
 
  If you didn't win, you can always click on over to Shabby Apple and go shopping! (Link is on our side bar.) And we have some really exciting giveaways coming up, so stay tuned!!
 
 
Briana

Tuesday, April 2, 2013

$75 Shabby Apple Giveaway!

Just a Reminder!
This is the LAST DAY to enter our $75 Shabby Apple Giveaway!
There are daily entries so you enter every day!
 
Serenade

Monday, April 1, 2013

No Bake Peanut Butter Cookies


Ingredients
2 cups Brown Sugar
1/4 cup Butter
1/2 cup Milk
1 cup Peanut Butter
1 tsp Vanilla
3 cups Rolled Oats

Directions
 Mix sugar, margarine, and milk in a large pot and bring to a full, rolling boil over med heat.
Boil for one minute, stirring constantly.
Remove from heat and stir in peanut butter and vanilla, stirring until peanut butter is melted, then stir in the oats. 
By spoonfuls drop the cookies onto waxed paper and let cool.
 
If Sugar-Free is your thing, try our Sugar Free Peanut Butter No Bake Cookies!